Mind maps are great for organizing ideas, planning projects, or breaking down complex topics. However, traditional mind mapping tools often rely on drag-and-drop interfaces, which can get messy and complicated to maintain.
PlantUML offers a text-based approach to mind mapping that's:
- Easy to edit: No more rearranging boxes manually.
- Version-control friendly: Ideal for teams using Git.
- Auto-layout: PlantUML handles the formatting for you.
- Documentation-read: Embed mind maps directly in Markdown, Confluence, or docs.
Let's look at a quick example of a mind map made with the help of PlantUML's simple yet powerful syntax:
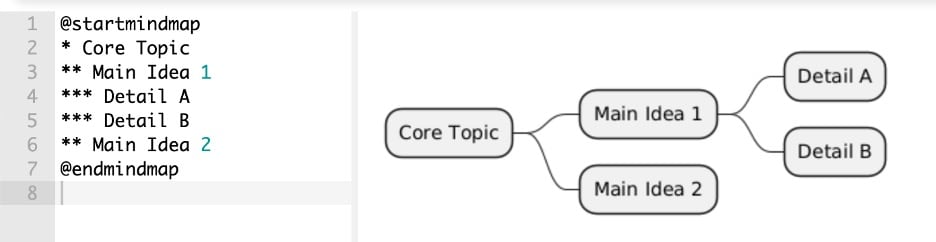
@startmindmap
* Core Topic
** Main Idea 1
*** Detail A
*** Detail B
** Main Idea 2
@endmindmap
In this article
Basic Mind Map Syntax
PlantUML's mind map syntax is simple. This means it is easy to learn, even for someone without deep coding experience. However, since coding is a skill not learned by many, having a bit of guidance will still be helpful in the long run. So, in this section, we'll be going through the basic syntax you need to learn and remember.
Practicing this basic syntax and playing around with it makes it easy to memorize them. You'll be writing PlantUML mind maps with no reference material in no time.
Root Node
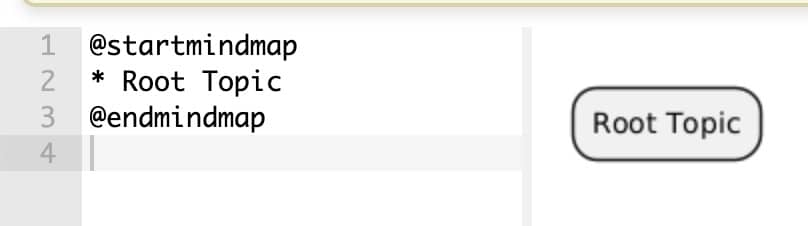
Every mind map starts with a root node. It's the central idea of your map. You mark it with one "*" asterisk symbol. This is where the mind map is all going to start. You can use this to define the central topic, idea, or process name for whatever purpose you use the mind map for.
Here's a quick visualization:
@startmindmap
* Root Topic
@endmindmap
Adding Subtopics
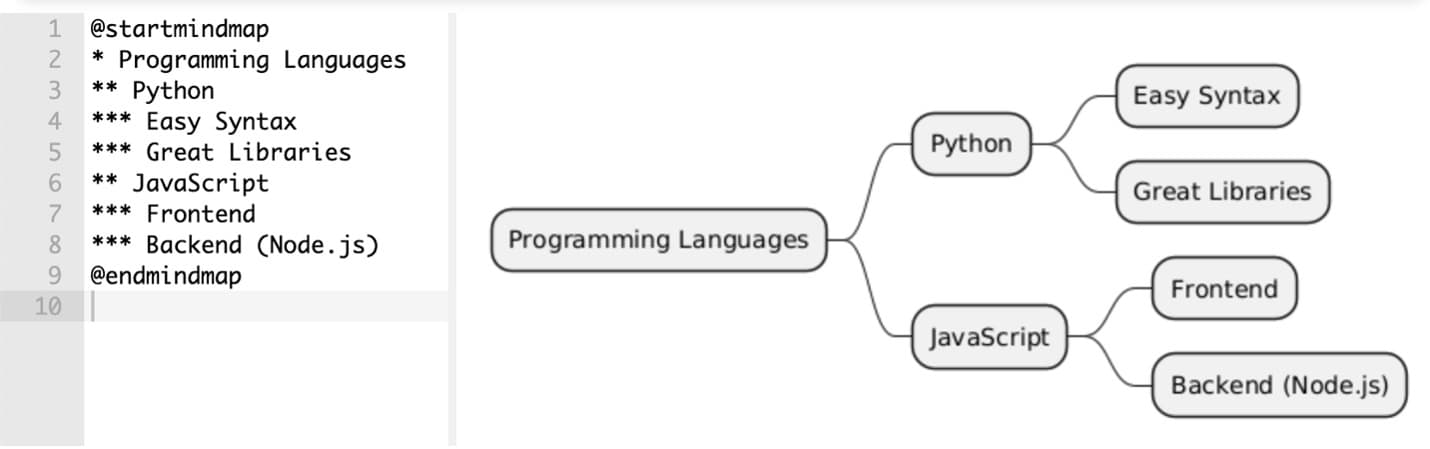
As earlier stated, mind map syntax in PlantUML is easy to remember. To add subtopics, use two asterisk marks: "**". This will indicate that the subtopic node branches out from the root ("*") node. Then, to add a subtopic under the "**" subtopic, use an additional asterisk "***" infinitely. So, for a tier-4 subtopic, you'll likely use four asterisk symbols: "****".
All you have to do is ensure the subtopic is written under its parent topic.
@startmindmap
* Programming Languages
** Python
*** Easy Syntax
*** Great Libraries
** JavaScript
*** Frontend
*** Backend (Node.js)
@endmindmap
Left/Right-Sided Nodes
By default, PlantUML arranges branches symmetrically. However, you can manually control the layout by replacing the asterisk mark "*" with the following, depending on where you want the node to go.
- Use "-" to force the branch to the left
- Use "+" to force the branch to the right
Here's an example of this in action:
@startmindmap
+ Root
++ Right Branch
+++ Sub-idea 3
-- Left Branch
--- Sub-idea 1
--- Sub-idea 2
@endmindmap

Advanced Mind Map Features
Once you're comfortable with the basics, PlantUML supports some powerful enhancements. From colored nodes to emojis and layout tricks, this section will go through them individually. These features help make your mind maps more precise and more expressive without necessarily losing functionality.
However, ensure that before diving into these advanced mind map syntax, you're well-versed in the above basic syntax. Only then can you appreciate and work well with the syntax provided in this section.
Styling Nodes
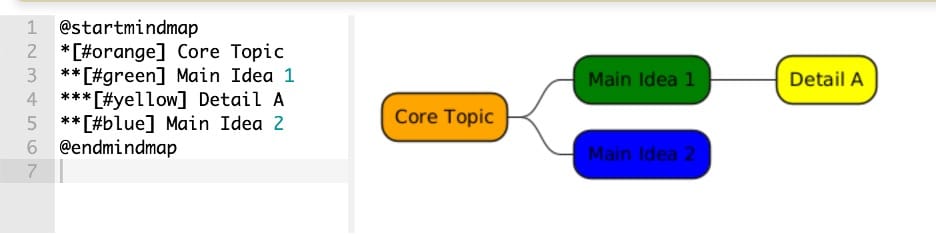
Using the [color] or [#hexcode] syntax, you can add color to individual nodes. If you're having difficulty describing the exact colors, then using hex codes instead of the color name might be a better option for you. However, for basic color-coding schemes, the basic color names should be sufficient:
@startmindmap
*[#orange] Core Topic
**[#green] Main Idea 1
***[#yellow] Detail A
**[#blue] Main Idea 2
@endmindmap
Icons & Emoji Support
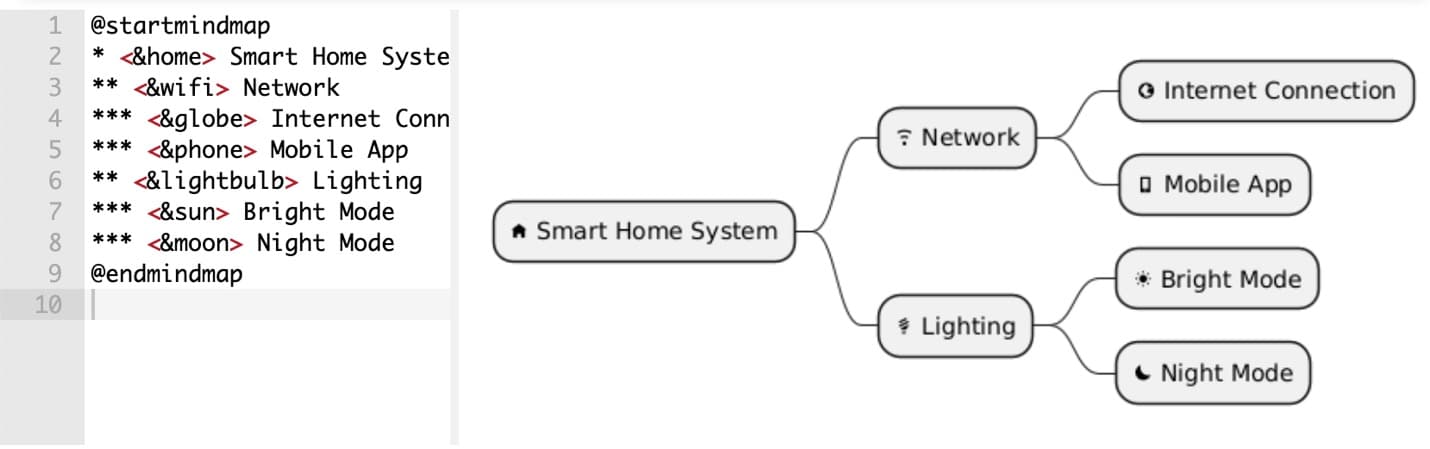
While PlantUML does support Unicode and has some emoji capabilities, the emoji support isn't as straightforward as just typing emoji characters directly. The support varies between local installations and the PlantUML server, and there are specific notation formats that you need to understand, such as using the OpenIconic emoji names.
@startmindmap
* <&home> Smart Home System
** <&wifi> Network
*** <&globe> Internet Connection
*** <&phone> Mobile App
** <&lightbulb> Lighting
*** <&sun> Bright Mode
*** <&moon> Night Mode
@endmindmap
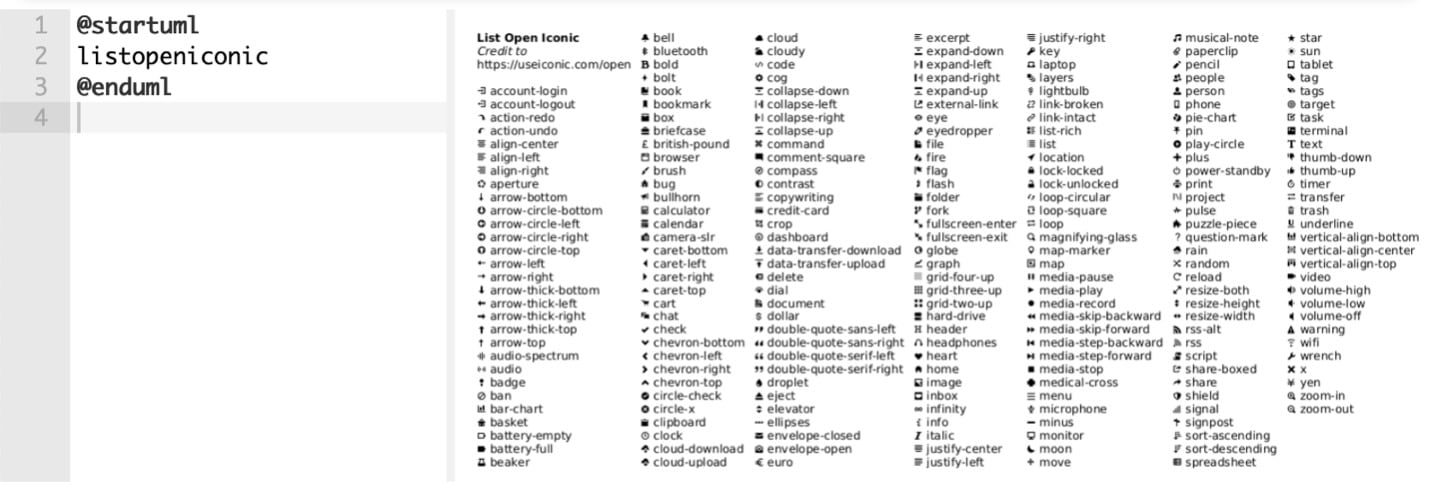
You can see the complete list of OpenIconic icons (universally supported) by using the special diagram:
@startuml
listopeniconic
@enduml
Fold/Unfold Nodes (for Larger Maps)
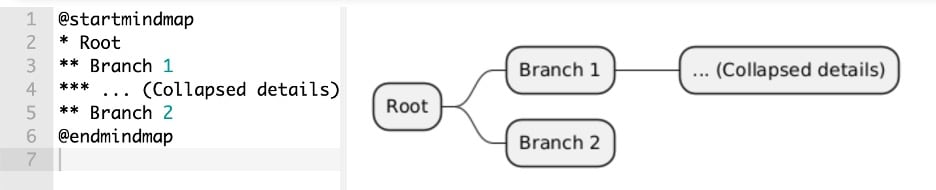
PlantUML mind maps are static images, so you can't click to expand/collapse branches like in interactive tools. However, you can simulate this manually. By writing something like "... (Collapsed details)", you hint that more content exists without overwhelming the diagram. You can also split large maps into multiple diagrams if needed.
Currently, PlantUML does not support interactive folding or hiding sections dynamically.
@startmindmap
* Root
** Branch 1
*** ... (Collapsed details)
** Branch 2
@endmindmap
Layout Structure & Tips
As your mind maps grow in size and complexity, layout becomes essential. There are several ways of adjusting the layout structure of the mind map. One example is how you can change the direction of the nodes with the "+" and "-" syntax. However, there are more ways to do this, such as by changing the direction or orientation of the mind map or adjusting node widths to avoid text overflows.
You'll see some handy information about layout structure and other tips as you read this section.
Change Direction (Horizontal to Vertical)
By default, PlantUML renders your mind maps in a horizontal format. However, you can also use the "top to bottom" direction, which renders it from the top down. This is useful when embedding maps in documents with more vertical space.
@startmindmap
top to bottom direction
* Root
** Left
** Right
@endmindmap

Adjust Node Width (Text Wrapping)
You can set a maximum width using skinparam maxWidth to make long node labels wrap more cleanly. This setting controls when text wraps inside nodes. This keeps your nodes readable without stretching them across the screen. It's beneficial for topics or processes that involve longer text, so you won't be limited to paraphrasing or shortening information to make a nice-looking map.
skinparam maxWidth 50
@startmindmap
* A very long topic name that wraps nicely
** Sub-idea
@endmindmap

Hyperlink Support
PlantUML allows you to turn any node into a clickable link using Markdown-style link syntax. These links are embedded in the rendered diagram and work in supported viewers like SVG with embedded URLs in HTML. It's an excellent option for teams looking to link external documentation to the mind map, which can help add more context or for making school notes.
Use the "SVG" export option because the links won't work if you render it via PNG. Here's a sample code for hyperlinks:
@startmindmap
* [[https://plantuml.com PlantUML Docs]]
** [[https://example.com Reference Link]]
@endmindmap

Real-World Examples
Finally, here are real-world examples of PlantUML mind maps and how they can be used in real scenarios. While you can make these mind maps anywhere, this section will show you why using PlantUML is a good option. Using text-based or syntax-based editors often helps you work more on adding information rather than worrying about alignments, colors, or shapes.
Thus, here's how you can use mind maps in different scenarios:
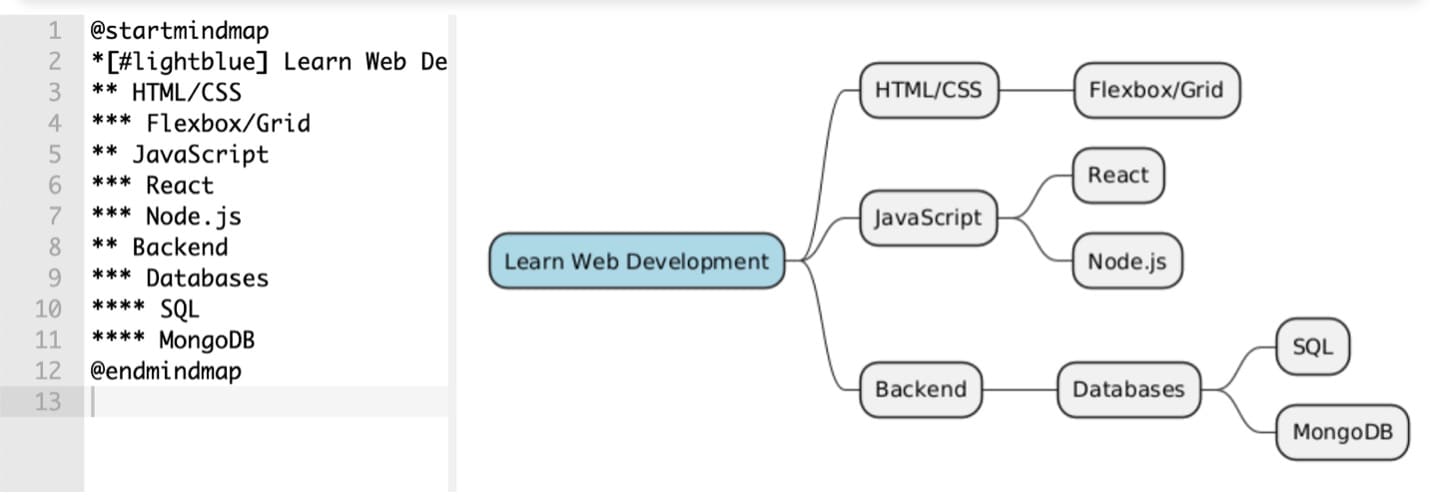
Learning Path Mind Map
Here's a visual guide to learning web development, broken down into key technologies. This map helps learners visualize what to study next and how concepts connect. For computer science or engineering majors, this kind of mind map is helpful for learning and practicing coding via the PlantUML language.
@startmindmap
*[#lightblue] Learn Web Development
** HTML/CSS
*** Flexbox/Grid
** JavaScript
*** React
*** Node.js
** Backend
*** Databases
**** SQL
**** MongoDB
@endmindmap
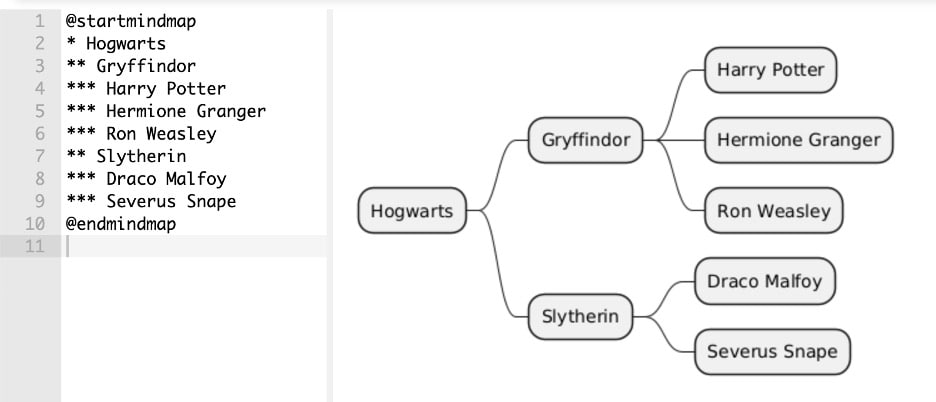
Harry Potter Mind Map
As you may know, mind maps are great for visualizing story structures or character relationships. It's even better when you're using text-based editors like PlantUML because all you have to do is continually type in the relevant information. This makes you worry less about mundane things like text or element alignment, colors, etc. Here's a simple character breakdown from the Harry Potter universe.
@startmindmap
* Hogwarts
** Gryffindor
*** Harry Potter
*** Hermione Granger
*** Ron Weasley
** Slytherin
*** Draco Malfoy
*** Severus Snape
@endmindmap
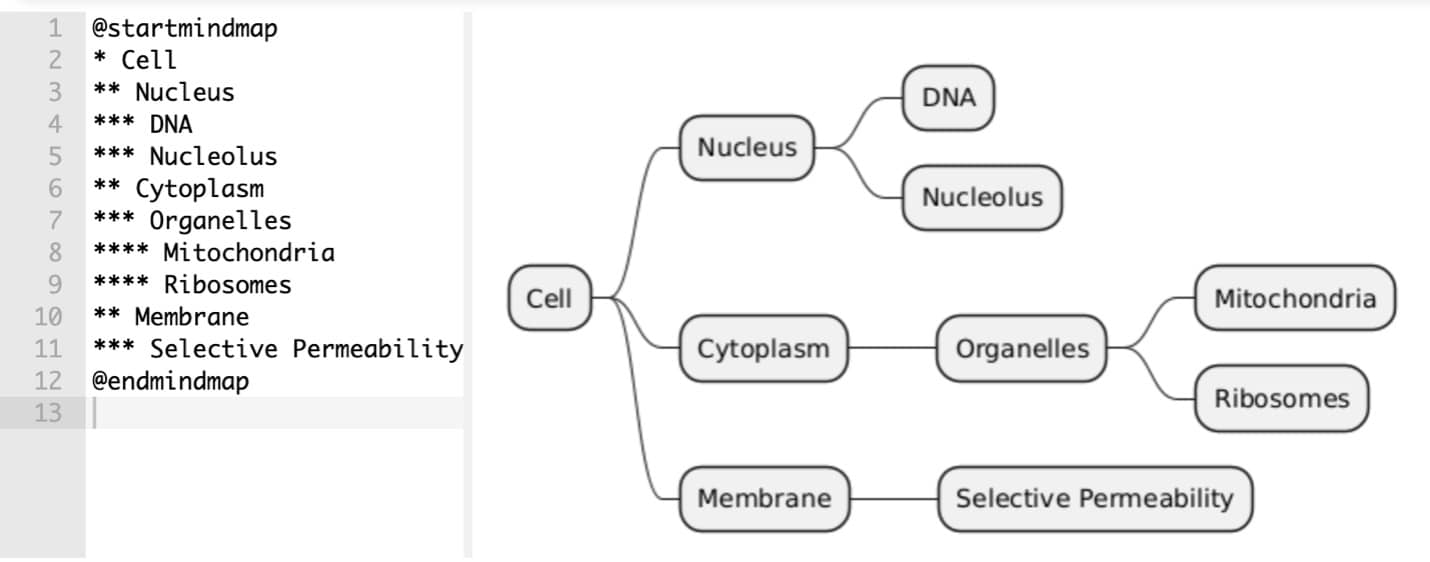
Cell Biology Mind Map
Another use for mind maps is for school or when working with more complex topics. Making mind maps is a tried and tested way to digest and visualize the information you read from your textbooks. Next time you encounter a complicated subject, try making mind maps with PlantUML. The text-based format forces your brain to process the information and make it suitable for a visual diagram.
Here's how you might use PlantUML to study biology. In this case, the parts of a cell:
@startmindmap
* Cell
** Nucleus
*** DNA
*** Nucleolus
** Cytoplasm
*** Organelles
**** Mitochondria
**** Ribosomes
** Membrane
*** Selective Permeability
@endmindmap
Common Mistakes & Fixes
Even though PlantUML mind maps are simple to write, a few common mistakes can make your diagrams hard to read or break the layout. Here's how to avoid them.
Too Many Nested Nodes
Over-nesting makes maps look cluttered and unreadable. It defeats having a mind map when it's visually hard to follow. Using too many subtopics (more than "*****") can be trouble for visual learners who might use your mind map as a reference.
Thus, you should use placeholders like "..." to indicate collapsed details - you can create a longer and shorter version of your mind map with PlantUML easily that they can refer to. Just "collapse" the parts that might not be relevant to certain contexts.
Unbalanced Left/Right Branches
If your layout looks too overcrowded, it might be because you're not correctly using the spaces available in your diagram. As you remember, there are ways to put left-side branches via the "-" symbol, and the "+" symbol for right-side branches. You essentially replace the "*" with these symbols. Just make sure to use them in a balanced manner.
Long Text Breaks Layout
Long labels can stretch your diagram awkwardly or overflow node boundaries. In the earlier section, you've learned how to use the "skinparam maxWidth xx" keyword or syntax to allow longer texts to wrap nicely inside the mind map. Since you can't control the appearance or size of shapes, it's best to use parameters like these to avoid text overflow.
When To Consider Alternatives
PlantUML mind maps are powerful, especially for developers and technical writers who value plain text, version control, and automation. But it's not the right fit for every team or situation.
PlantUML Limitations
While PlantUML is great for code-centric workflows, it has a few trade-offs:
- Steep learning curve: For non-developers unfamiliar with text-based syntax, using PlantUML might be overwhelming. Especially when you're run down with much more work to do, learning a new language can be annoying.
- Limited layout control: PlantUML doesn't offer comprehensive layout control, unlike its GUI counterparts. You can't make a node go right a certain way or adjust the spacing. While a significant advantage of PlantUML is that you don't have to worry about layout, it's also one of its biggest cons.
- No drag-and-drop editing. This may slow down brainstorming sessions for visual thinkers, especially those just beginning to learn the language.
GUI Tool Options
For teams that prioritize ease of use or visual editing, WYSIWYG tools may be a better fit. After all, tools like EdrawMind offer unparalleled ease (compared to PlantUML) in creating mind maps because they work with the "visual" aspect of diagrams, unlike PlantUML, which leaves you hanging as to what your mind map might look like until it renders.
Thus, the benefits of GUI tools are:
- Prebuilt templates for faster mind map creation
- Drag-and-drop interface for easy rearrangement
- Built-in styling and export options for presentations


Conclusion
PlantUML mind maps are a powerful tool for dev-centric workflows. They're version-controlled, text-based, and integrate seamlessly with documentation platforms. They shine in technical environments where structure and automation matter.
Consider evaluating GUI tools like EdrawMind or XMind for non-technical stakeholders or rapid visual brainstorming. The right choice depends on your team's workflow and comfort with code.