Collaborating on timelines in PowerPoint or Excel is a nightmare. Dates shift, versions multiply, and you’re left digging through ‘final_v4.pptx’ files just to find the latest update.
While code-based tools like Mermaid solve this with Git-friendly timelines, they require technical skills. That’s where EdrawMind’s visual timeline maker shines: get the clarity of Mermaid without learning syntax.
In this write-up, I'll explain:
- How to make Timelines in Mermaid with pro tips
- The best Mermaid alternatives for non-technical users
- How Mermaid streamlines updates, collaboration, and formatting compared to traditional tools
In this article
Part 1: Why Mermaid Timelines Beat Traditional Tools
Creating timelines in tools like PowerPoint or Excel might feel familiar. Still, they're often more trouble than they're worth, especially when you're working with teams or updating plans frequently.
5 Pain Points of Manual Timeline Creation
1. PPT/Excel Version Control
When multiple team members edit timelines:
- Dates and labels change without tracking
- "Final_v4.pptx" files clutter your Dropbox
- No way to compare changes or revert mistakes
2. Wasted Time on Formatting
Most effort goes to manual adjustments:
- Drag shapes to align perfectly
- Fix broken layouts after small edits
- Reapply colors and styles across slides
3. Disconnected from dev Workflows
Traditional tools can't:
- Sync with GitHub/GitLab repositories
- Link to Jira tickets or project boards
- Auto-update when code changes
4. Limited Version Control
Traditional tools lack:
- Change tracking (what changed/when/why)
- Git-like traceability
- Have to ask teammates about edits
5. Not reproducible or scalable
With traditional tools:
- Every new timeline means starting from scratch
- Duplicate slides risk formatting breaks
- Create bottlenecks for organization-wide consistency
How Mermaid Solves These Problems
Mermaid solves all of that and does it with less friction, even for non-devs. Just paste a simple code into MermaidChart, and it'll render the full timeline instantly.
Key Benefits of Mermaid Timelines:
- Code-Based Collaboration: Changes appear instantly, with Git-friendly tracking.
- No Formatting Hassles: Syntax handles alignment, styles, and layouts automatically.
- Dev Workflow Integration: Sync with GitHub, Jira, and other tools.
- Scalability: Reuse templates, track versions, and update timelines with minimal edits.
.mmd files in your project repo to keep timelines synced with development.Not a coder? Try EdrawMind's visual timeline maker for its drag-and-drop simplicity, offering similar benefits.
Why Teams Switch to Mermaid
| Traditional Tools | Mermaid |
|---|---|
| 🔄 Manual version tracking | ✅ Native Git integration |
| ⏳ 1-hour formatting per edit | ⚡ Instant code-to-diagram rendering |
5-Minute Mermaid Timeline Tutorial
Creating a timeline in Mermaid is fast. Follow these steps:
- Copy this code to Mermaid Live Editor:
timeline
    title Project Roadmap
    2025-01 : Kickoff
    2025-03 : Prototype
    2025-06 : Beta
    2025-09 : Launch
- Click Render → See your timeline instantly
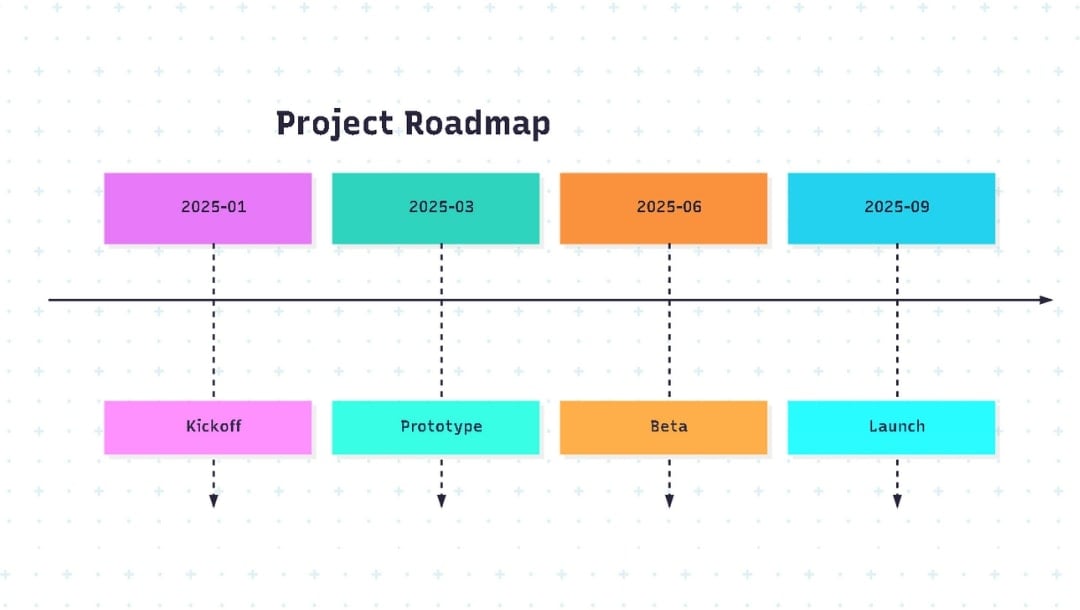
This four-line block creates a clean vertical timeline with your key project milestones in place. You don't need to install anything or deal with manual drag-and-drop formatting. It just works.
Key Elements
Let me break down what each part of that block actually does:
- timeline: This is the command that tells Mermaid you're drawing a timeline diagram. It's the first line and required.
- title: Sets the main title of your timeline. It appears at the top. If you skip this, Mermaid still renders the diagram, but it feels incomplete.
- YYYY-MM: This is how you define event dates. The format is strict, 4-digit year + 2-digit month (e.g., 2025-03). Don't include days unless needed.
- Event Description: Anything after the colon is the event label. This text appears next to the timeline dot. Keep it short and clear.
Part 2: Advanced Timeline Techniques
Once you're comfortable with the basic syntax, Mermaid offers a few more advanced timeline features that help you structure, style, and maintain large or collaborative project plans.
Here's how I've used them to keep timelines organized across complex team projects.
1. Multi-Section Timelines
If your project involves multiple teams or distinct phases, separating your timeline into sections helps keep everything readable. Each section groups related events under a subheading.
timeline
    section Team Alpha
        2023-03 : Research
        2023-05 : Prototype
    section Team Beta
        2023-04 : Market Analysis
        2023-06 : Campaign Design
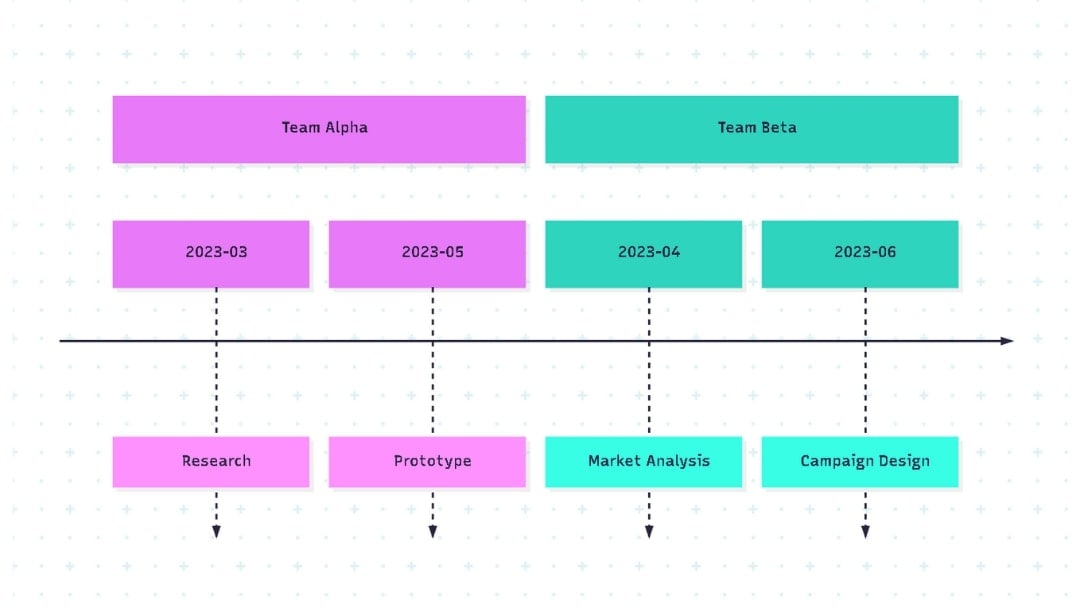
It creates a clear visual split between Team Alpha and Team Beta, even if their events overlap in time. I often use this when I need to track parallel workflows, like design and development teams working in sync.
Pro Tip: Use teams, departments, or phases as section headers. Stick to a consistent naming convention (e.g., "Phase 1", "Marketing Team", or "QA Cycle") to help collaborators scan the diagram.
2. Theme Customization
Mermaid allows you to tweak the visual theme of your diagrams. Though not for full customization, it helps if you want to match your timeline with internal documentation styles or presentations.
To apply a theme, use the %%{init: ...}%% syntax before the timeline block:
%%{init: {'theme': 'forest'}}%%
timeline
    title Styled Timeline
    section Critical Path
        2023-01 : Planning
        2023-04 : Development
    section Optional
        2023-06 : Testing
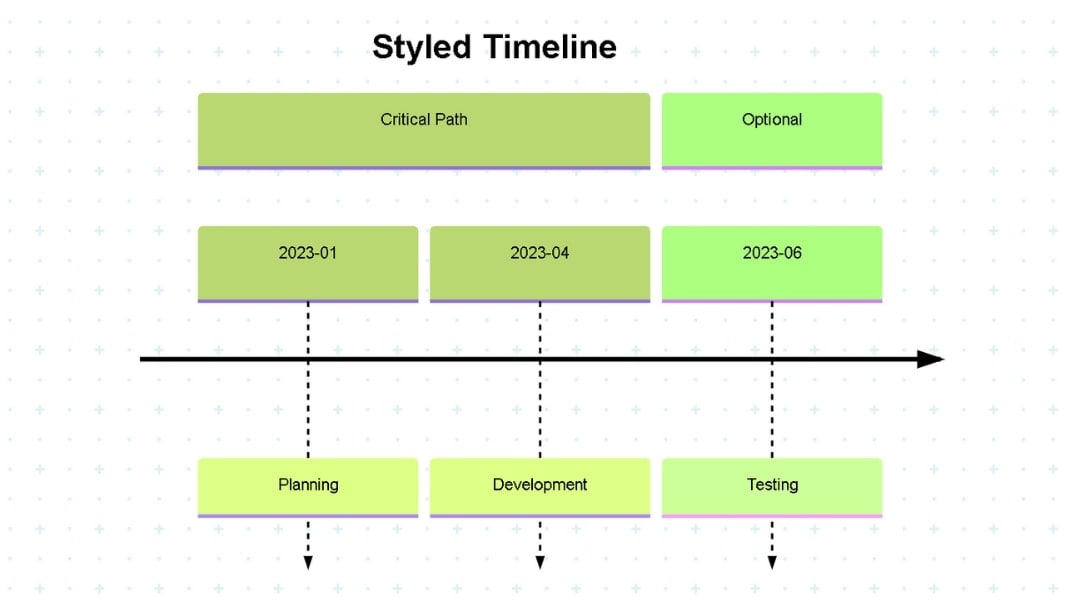
Popular built-in themes include:
- default
- forest
- base
- dark
- neutral
You can switch themes to match your context, like dark mode for dev-focused docs or forest for internal decks.
Pro Tactic: If you're embedding Mermaid in Markdown (e.g., GitHub, Notion), check which themes are supported natively; some platforms only render the default theme.
3. Long Descriptions
You might want to explain milestones in more detail. Mermaid doesn't limit label length, but if a line becomes unreadable, break it manually using \n.
timeline
    title Sprint Plan
    2024-01 : Design Finalized\nReady for Dev
    2024-02 : Dev Begins
    2024-03 : Internal Review
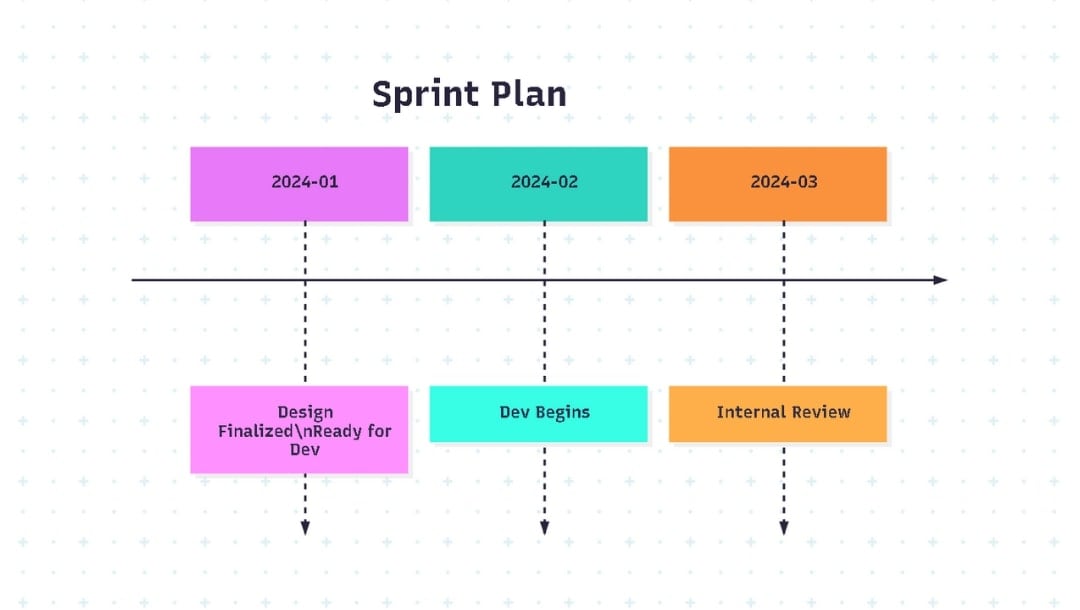
It keeps the layout tidy without cutting down.
4. Event Ordering
Mermaid renders events chronologically based on the date, not the order in which they appear in the code. That means you can mix event declarations, and they'll still display in sequence.
Still, I recommend declaring events in order, especially in multi-section timelines. It reduces confusion when revisiting or debugging the timeline later.
5. Global Styling
If you're using the same theme or config across many diagrams, you can declare it globally at the top of your Mermaid file:
%%{ init: { 'theme': 'neutral', 'themeVariables': { 'fontSize': '14px' } } }%%
This configuration is helpful when creating documentation sets with a consistent look.
For larger teams or long-running projects, it becomes crucial to label well, group logically, and maintain readable styling across platforms.
With Mermaid, all of that stays manageable in a few lines of code. These advanced tactics enable you to scale timelines without compromising clarity.
Part 4: AI-Powered Timeline Generation
You don't always need to start a Mermaid timeline from scratch. When you're short on time or just unsure of the correct syntax, AI can handle the heavy lifting.
Here's exactly how I've used it to generate timelines faster, especially during sprint planning or project retrospectives.
What Can You Ask AI to Do?
Mermaid AI can generate:
- Full-fledged timeline structures and codes
- Event placeholders you can edit later
- Theme integration, if you specify the look
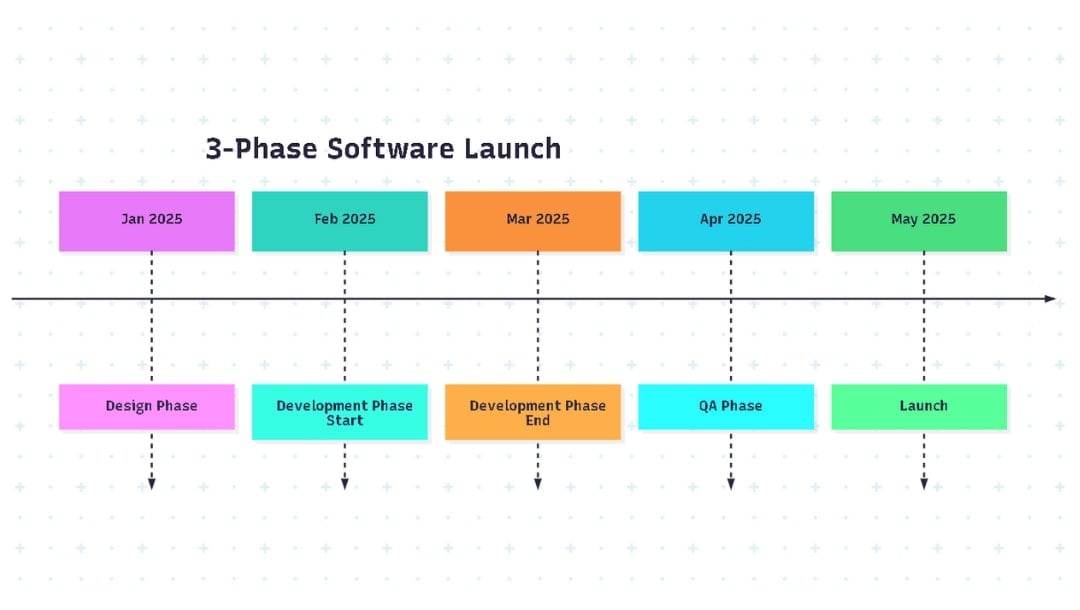
For example, I often write a simple prompt, and it instantly generates the timeline.

The output typically looks like this:
timeline
  title 3-Phase Software Launch
  Jan 2025 : Design Phase
  Feb 2025 : Development Phase Start
  Mar 2025 : Development Phase End
  Apr 2025 : QA Phase
  May 2025 : Launch
How to Make AI Output More Accurate?
You'll get better results by being specific in your prompts:
- Use exact date formats (YYYY-MM)
- Define phases or sections if you need them
- Mention if you want a title or theme
- Limit events to 5-7 if you want a readable output
Part 5: 6 Free Practical Timeline Templates
Once you understand the syntax, the next step is knowing where and how to use timelines effectively. Below are ready-made templates I've used or adapted in practical projects. You can paste them into MermaidChart and modify the dates or milestones to fit your needs.
Project Management Timeline
This one's ideal for tracking a full product sprint, from design through to user acceptance testing.
timeline
    title App Development Sprint
    section Design Phase
        2023-01-15 : Wireframes Approved
        2023-02-01 : UI Design Complete
    section Development
        2023-02-15 : Backend API Ready
        2023-03-10 : Frontend Feature Complete
    section Testing
        2023-03-15 : QA Cycle 1
        2023-03-25 : Bug Fixing
        2023-04-01 : UAT Sign-off
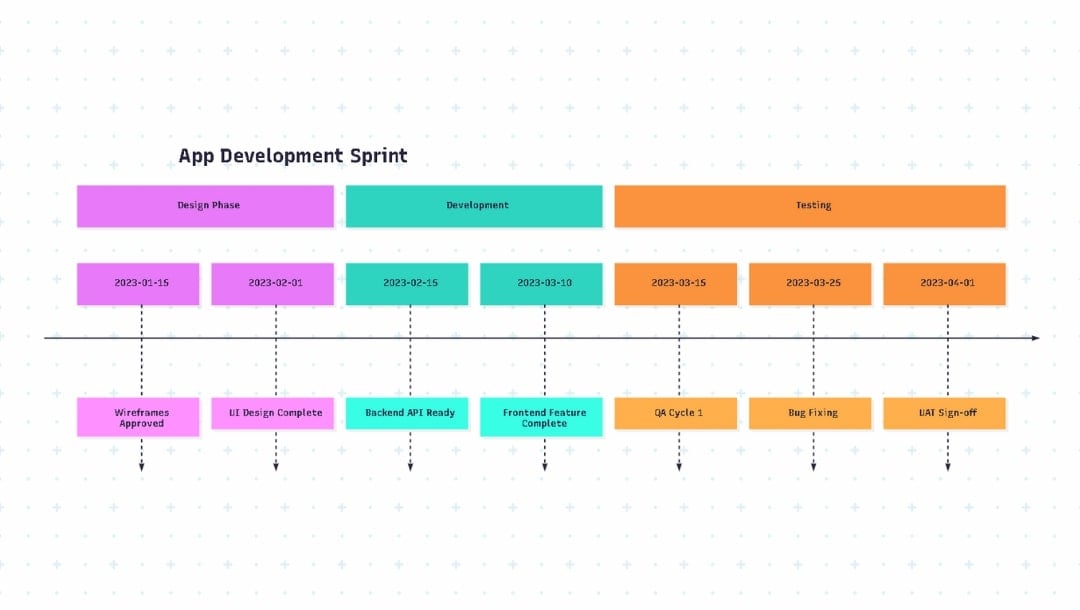
Use this format when you need to visualize handoffs between design, development, and QA. Each section corresponds to a phase, making it easier to assign ownership and review timelines during meetings.
Historical Timeline
Use this for chronological events where you don't need grouping by section. It's perfect for educational content or storytelling.
timeline
    title Space Exploration Milestones
    1957-10-04 : Sputnik 1 Launch
    1961-04-12 : First Human in Space (Gagarin)
    1969-07-20 : Moon Landing
    1998-11-20 : ISS Launch
    2021-07-20 : First Civilian Space Flight
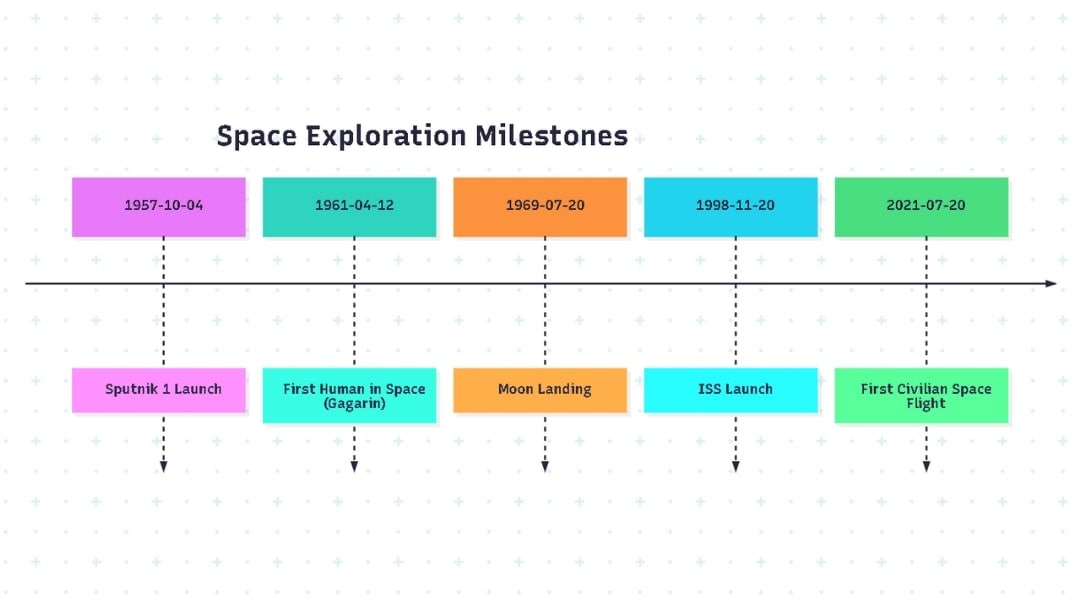
I've used this format for team onboarding docs to show company or industry history. It also works well for pitch decks when showcasing market evolution or technological breakthroughs.
Product Roadmap
Helps communicate upcoming product milestones across teams, stakeholders, or customers.
timeline
    title SaaS Platform Evolution
    section 2023
        Q1 : User Management Module
        Q2 : Billing System
        Q3 : API Marketplace
    section 2024
        Q1 : AI Features
        Q2 : Mobile Apps

Each quarter highlights a high-level deliverable. I typically use this in public roadmap documentation or internal sprint planning with leadership. It's easy to extend, shift, or update.
Content Calendar Template
For marketers and creators managing multi-channel content campaigns.
timeline
    title Marketing Content Plan
    section Jan 2025
        2025-01-05 : Launch Blog Series
        2025-01-12 : Email Campaign 1
    section Feb 2025
        2025-02-02 : Whitepaper Publish
        2025-02-15 : Webinar
    section Mar 2025
        2025-03-01 : Campaign Wrap-Up
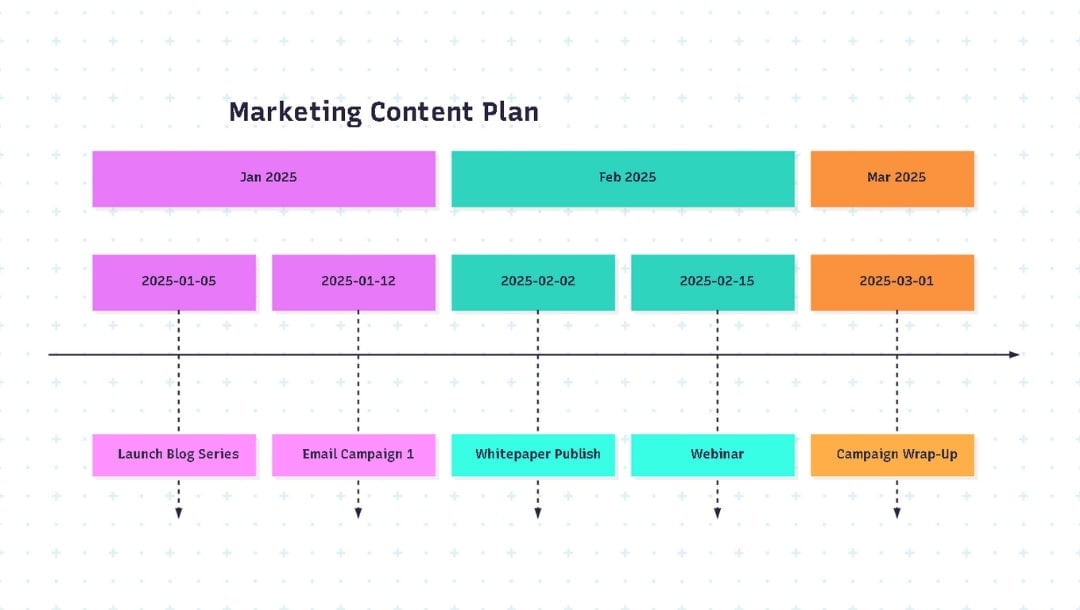
I've built variations of this to track content production, launches, and deadlines across blogs, emails, and events. Grouping by month makes it easier to plan and identify bandwidth issues.
Hiring Timeline for Startups
Tracks the end-to-end hiring process, which is great for small teams filling one or two key roles.
timeline
    title Hiring Plan Q1
    section Week 1-2
        2025-01-03 : Role Definition
        2025-01-10 : Job Post Live
    section Week 3-4
        2025-01-17 : Shortlisting
        2025-01-24 : First Interviews
    section Week 5-6
        2025-01-31 : Final Round
        2025-02-07 : Offer Sent
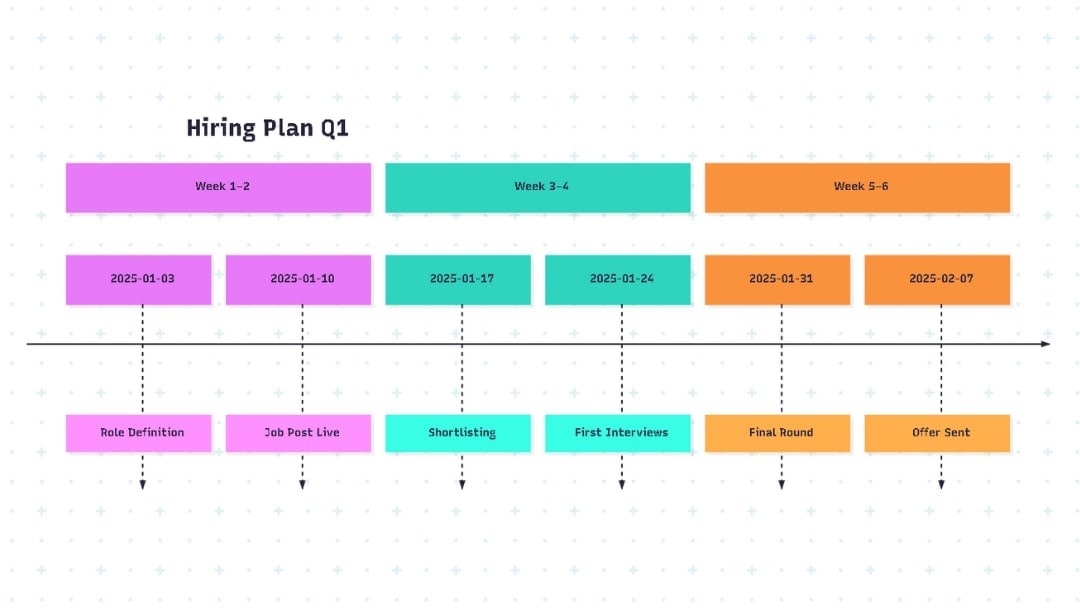
I've used this when hiring engineers under tight timelines. Having clear week-by-week targets helped keep everyone, HR, tech leads, and founders, aligned without weekly check-ins.
Personal Learning Plan
A self-guided roadmap for upskilling in structured stages.
timeline
    title UI/UX Learning Track
    section Phase 1
        2025-02-01 : Complete Figma Basics
        2025-02-10 : UI Design Patterns
    section Phase 2
        2025-02-20 : UX Research Deep Dive
        2025-03-01 : Build Portfolio Project
    section Phase 3
        2025-03-15 : Feedback & Iteration
        2025-03-25 : Share on Behance
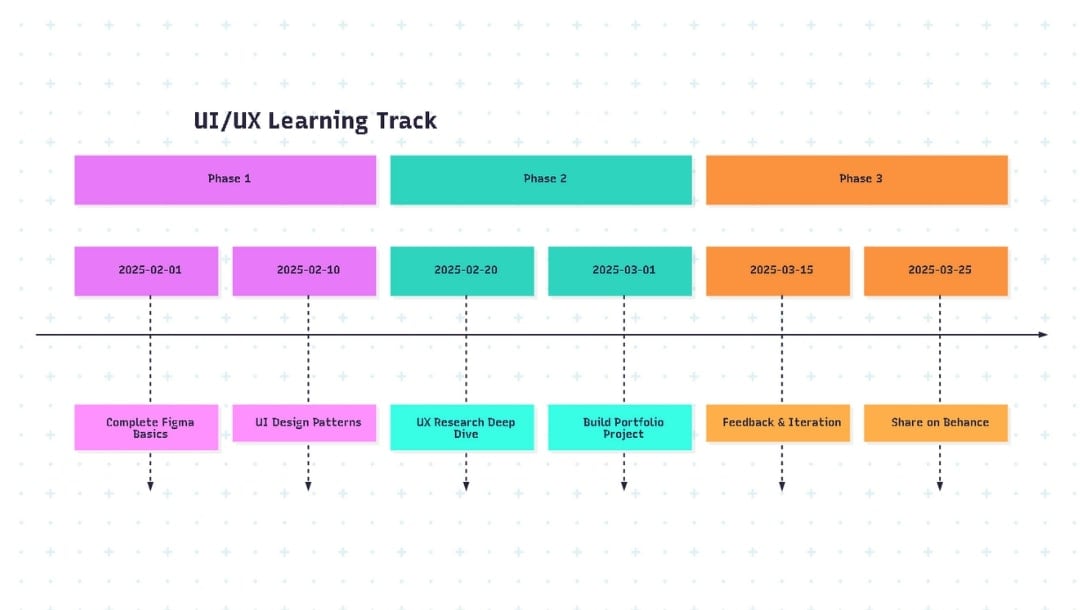
This format is particularly helpful if you're planning a 30- to 60-day learning sprint. I've used it to map courses, self-imposed deadlines, and project milestones, which are especially helpful when juggling learning alongside work.
These templates save time and ensure consistent timelines across teams and projects. Keep one version in your repo or Notion and reuse it by just swapping out section titles and event dates. You'll never go back to slide decks.
Part 6: Pro Tips & Troubleshooting
Once you start building more timelines in Mermaid, small issues can creep in, such as misplaced dates, rendering errors, or diagrams that just won't look right.
Below are practical tips and fixes that have helped me streamline my timeline workflow and avoid common mistakes. Use these as a quick reference while editing or debugging.
Best Practices
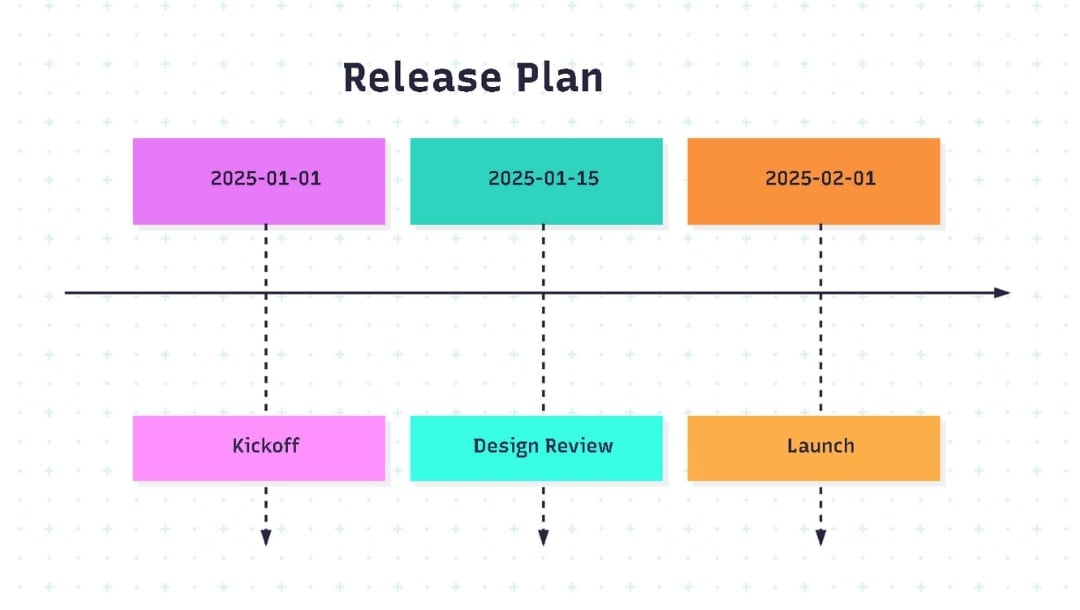
Use Consistent Date Formats
Always stick to the YYYY-MM-DD format, even if your timeline doesn't require the day. Mermaid supports YYYY-MM, but mixing formats (e.g., adding days to only some entries) can cause display issues or make your events render out of order.
timeline
    title Release Plan
    2025-01-01 : Kickoff
    2025-01-15 : Design Review
    2025-02-01 : Launch
Use Phases Instead of Crowded Dates
Avoid putting 6-7 events under a single section or the same month. Group related items under sections (phases, teams, months) to improve readability.
section Design
    2025-01-01 : Wireframes Complete
    2025-01-10 : Design Review
One Event Per Line
Mermaid requires each timeline event to be on its line. Don't stack multiple events after a single colon or inline. It will break rendering or ignore additional events.
Don't do this:
2025-01 : Start | Kickoff | Initial Setup
Do this instead:
2025-01-01 : Start
2025-01-02 : Kickoff
2025-01-03 : Initial Setup
Save Timeline Code as .mmd Files
Saving Mermaid diagrams as .mmd files helps with version control and live preview. Use extensions like "Markdown Preview Mermaid Support" for real-time rendering.
Keep Diagram Length in Check
Mermaid doesn't paginate or limit scrolls. If your diagram gets too long, split it into two separate timelines (e.g., "Q1 Milestones" and "Q2 Milestones") to make them more readable.
Common Errors & Fixes
| Error | Fix |
|---|---|
| Out of order Dates | Add this at the top to enable debug mode: %%{init: { 'logLevel': 'debug' }}%% |
| Missing title | Always start with the title before listing events. It's required to structure the diagram. |
| Rendering fails | Check for extra spaces or tabs before colons or ask AI to fix it. Mermaid is sensitive to indentation and whitespace. |
| Sections not grouping | Ensure the word section is not indented, and each group has at least one event. |
| Overlapping events | Spread out the dates or break long labels with \n to avoid visual collisions. |
| Labels too long | Use \n inside event descriptions to break them into two lines. Example: 2025-02 : Internal Review\n(Design + Dev) |
| Strange layout | Refresh MermaidChart or restart your preview window; sometimes, cache causes glitches. |
Additional Tactics I Use
- Use Version Comments
Add a version or author comment at the top of your code when collaborating:
"%% Timeline created by [YourName], v1.2 %%"
- Add Placeholder Events Early
For drafts, add placeholders like:
2025-06: TBD. It helps you visualize gaps even before actual events are finalized.
- Preview Early, Preview Often
Don't wait until the end to test rendering. Paste small chunks into MermaidChart during editing so you catch errors before they pile up.
These simple habits keep timelines clean, consistent, and collaboration-ready, especially when you're juggling dozens of deadlines or working across multiple teams.
Part 7: When to Consider Enhanced Solutions
Mermaid is fast, flexible, and lightweight, but it's not built for everything. If your timelines are becoming more complex or you're trying to manage broader projects across teams, there's a point where Mermaid starts to fall short.
Here are clear signs it's time to consider a dedicated timeline tool:
Signs You Need a Dedicated Timeline Tool
- You manage multiple overlapping workstreams that require linked timelines.
- You rely on non-technical users (like clients or HR) to view or update project plans.
- You need to highlight dependencies, critical paths, or blockers visually.
- You're tired of jumping between Mermaid and other tools just to keep your project doc up-to-date.
When Mermaid Hits Its Limits
Common Challenges You May Face
- Complex dependencies: Mermaid doesn't support automatic critical path calculations or dependency chains. For Gantt-like scheduling or interdependent task tracking, you'll need more than basic syntax.
- Dynamic updates: Mermaid diagrams don't auto-sync with external tools like Jira, Trello, or ClickUp. Every update requires a manual code change, even for something as simple as shifting a milestone by a week.
- Visual refinement: You can't adjust individual colors, icons, or layouts easily. If you're building a polished visual timeline for a presentation or client, Mermaid's minimal styling will feel limiting.
- No Interactive collaboration: Mermaid works great with version control, but not with real-time edits from non-technical team members. There's no drag-and-drop UI or multi-user editing session.
- The steep learning curve for non-Devs: Even if you love code, your marketing or product team might not. Teaching Mermaid syntax to cross-functional teams isn't always practical.
If you've hit any of these roadblocks, it's not about replacing Mermaid but about using the right tool for the right job. I still use Mermaid for creating quick diagrams, development logs, and change logs. But for high-visibility timelines or client-facing planning, I prefer a full-featured visual platform.
EdrawMind: Free Online Timeline Maker
If you're looking for a timeline tool that doesn't require writing a single line of code, EdrawMind is a solid Mermaid alternative. It's an online visual workspace built for brainstorming, planning, and collaborating on timelines, even if your team has zero technical background.


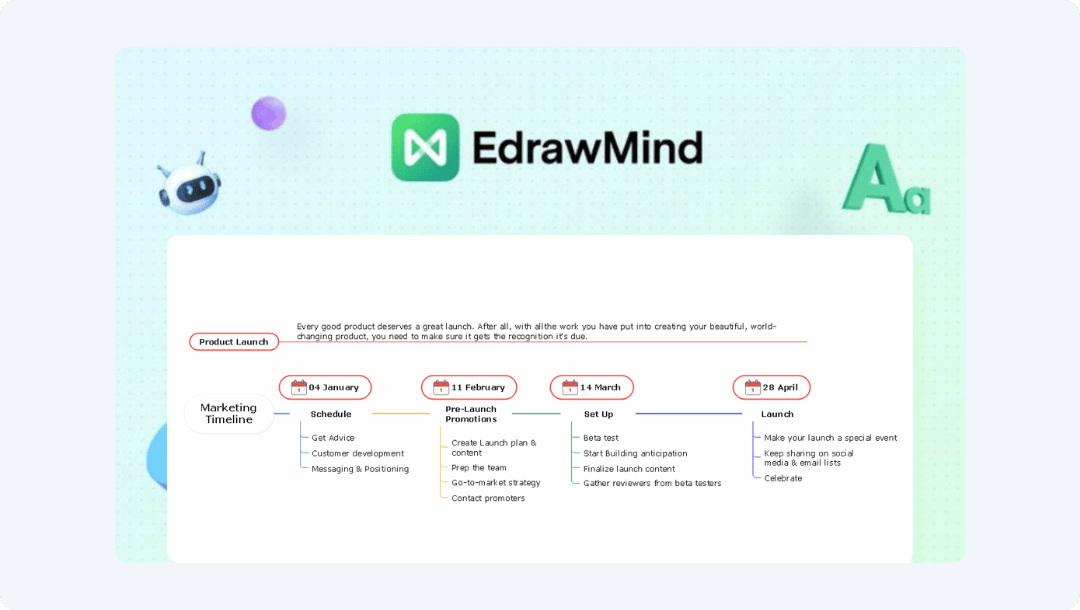
Why You'll Love It
- Drag-and-drop simple interface: Quickly map out key phases and milestones without manual formatting.
- AI-powered planning: Generate full timelines from quick prompts without syntax.
- Template gallery: Thousands of customizable diagrams, including timeline-specific designs.
- Real-time collaboration: Invite team members to co-edit timelines live (available in the online version).
- Flexible output: Export your timeline to PDF, image, Word, or even PowerPoint.
It works on the web, desktop, and mobile; no installs are needed. You can start for free and upgrade if you want advanced customization and full access.
Mermaid is great for devs. EdrawMind is great for teams. Use both where they shine.