


Problems don't always come from one place. In business, healthcare, or education, issues often have many causes. If we only fix the surface, the same problems return. That's where the Fishbone Diagram, also called the Ishikawa Diagram, comes in.
This tool helps teams find root causes, not just symptoms. It breaks problems into categories so you can see the bigger picture. One of the most popular versions is the 5Ms approach: Manpower, Machine, Method, Material, and Measurement.
In this guide, we'll explore the 5Ms in the Fishbone diagram. We'll show you why they matter and explain how to create your own diagram.
In this article
What's a Fishbone Diagram?
The Fishbone Diagram is a visual tool that resembles the skeleton of a fish. The "head" shows the problem. The "spine" runs through the middle. Branches come out from the spine to show possible causes.
It was developed by Kaoru Ishikawa in the 1960s. At that time, the Japanese industries were undergoing changes in quality control. Ishikawa wanted to find a simple way for teams to examine problems together. As a result, he developed this diagram, which we now use all over the world.
The purpose of the Fishbone Diagram is to help us find the root cause of a problem. Instead of just jumping to a solution, we dig deeper to understand the cause of why this happened. What factors contributed to this? The Fishbone Diagram allows us to trace every possible cause and avoid missing Important details.
The structure is easy to understand:
- Head: The primary problem or effect.
- Spine: The central line leading to the head.
- Branches: The categories of causes.
It's simple in structure, but the impact is significant. Teams can see all causes in one place. This makes the discussion clearer and the decisions smarter.
The 5Ms in the Fishbone Diagram
In manufacturing and process improvement, one version of the diagram is very popular. It focuses on five key categories, known as the 5Ms:
- Manpower
- Machine
- Method
- Material
- Measurement
These categories cover most areas where problems can occur. Let's look at each one in detail:
1. Manpower
Manpower refers to people involved in the process. Problems here can come from a human aspect. There may be issues with training, communication, or people may be fatigued. Sometimes errors occur because there is poor supervision or the instructions are confusing.
For instance, an operator is making repeated mistakes while working on an assembly line. The issue likely isn't anything to do with laziness, but poor training or overly long working times. By putting it in "Manpower," the crew will know what to work on.
2. Machine
Machine refers to equipment, tools, and technology. Even the best worker would make errors if machines are unreliable. The causes may be mechanical failure, poor calibration, and lack of maintenance.
For example, a packaging machine is continually sealing products poorly. The failures may occur from worn-out parts or incorrect settings. Absent from attending to fixing the machine, the failure will continue.
3. Method
This "M" refers to how things are done. Even with good people and working machines, bad methods can create bad outcomes. If a company doesn't have a standard operating procedure, it will be more prone to human error.
One example could be failing to follow a safety step, which would create risk for the employees. Reviewing the "Method" allows for the possible need to update or improve the process.
4. Material
Material includes the raw inputs, supplies, or components used in the creation of a product. Poor-quality materials result in poor-quality products. In addition to quality, shortages or contamination are other outcomes related to material that present big problems.
A clothing company receives fabric that tears very easily. Even if the production workers and machines work perfectly, the product will fail if the materials are of poor quality. By placing this information under Material, the clothing company plans to look at the suppliers for poor-quality materials.
5. Measurement
Measurement is how you track performance. If your company or business does not have a good measurement system, you might not even realize something went wrong with your services. Incorrect data, bad testing, or only doing one assessment (with missing metrics) can mislead teams.
If the company measures customer satisfaction poorly, it will not know if service has dropped. Reviewing the measurement that leads to data and feedback systems will allow for accurate measurement.
How to Create a Fishbone Diagram with the 5Ms?
Now that you know what a Fishbone Diagram is, let's see how to create one. The process is simple if you follow each step carefully.
- Define the problem: Write the issue clearly. Place it at the "head." Example: "Product defects in final batch."
- Draw the spine and 5 branches: Use ready-made Fishbone templates. Label the five branches with the 5Ms: Man, Machine, Method, Material, and Measurement.
- Brainstorm causes: Add smaller lines under each branch. Write possible issues. For example, under Manpower, add "lack of training." Under the machine, add "poor calibration."
- Discuss and analyze: Review with your team. Move items if needed.
- Identify root causes: Highlight the most likely causes. Then create action steps. Maybe training is needed, or machines need repair.
- Choose a fishbone diagram tool: A fishbone diagram tool helps you make fishbone diagrams easily. Select one with ready-made templates to save time and get new ideas easily.
Steps to Make the 5Ms in the Fishbone Diagram
I have used Wondershare EdrawMind to sketch the fishbone diagram from scratch. You can start from a template directly.


Step1 Create a New File & Add Title
- Install and open Wondershare EdrawMind.
- Click Create > Blank Mind Map to start a new file.
- Once the blank canvas appears, go to Layout > Fishbone to apply the fishbone diagram layout.

Step2 Add the Main Title
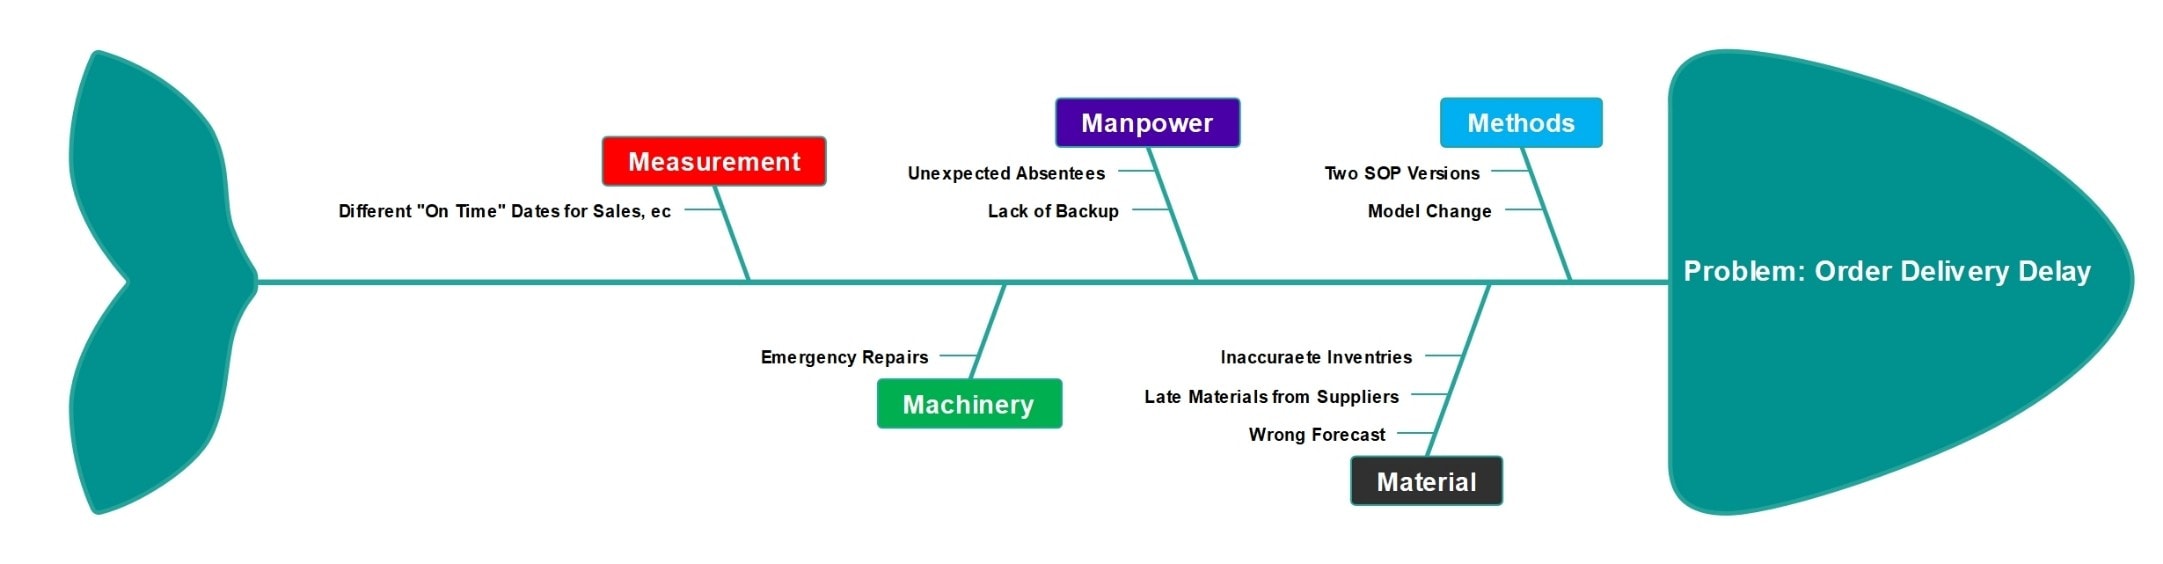
- Click the central topic box and replace the placeholder text with your main title: Problem: Order Delivery Delay.
- This title represents the main issue you’ll analyze in your fishbone diagram.

Step3 Insert Main Branches (Categories)
- Add or rename the five main branches if needed: Measurement, Manpower, Methods, Machinery, and Material.

Step4 Add Sub-Causes Under Each Branch
- Click each branch and add smaller sub-branches with details about each branch.

Step5 Customize the Diagram
- Use the floating or right side toolbar to customize your diagram.
- Use different colors for each to make them easier to identify.
- Adjust font size and spacing for a cleaner look.
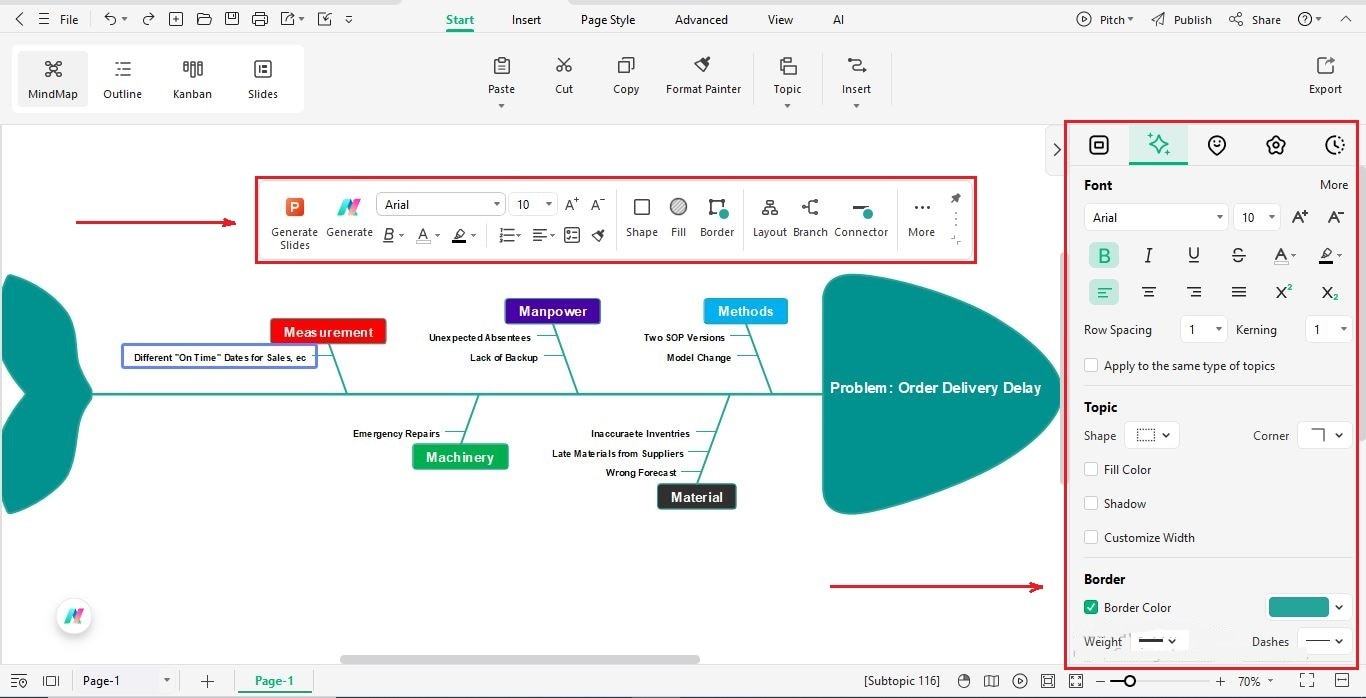
Step6 Save and Export
- Click File in the top-left corner and choose Save to keep an editable version of your work.
- To share it, click Export and pick a format like PDF, JPG, PNG, and more.
- Click Publish to share it with the EdrawMax community if you want to show your diagram to others online.

Examples of Using the 5Ms Fishbone Diagram
1. School Service Quality Fishbone Diagram
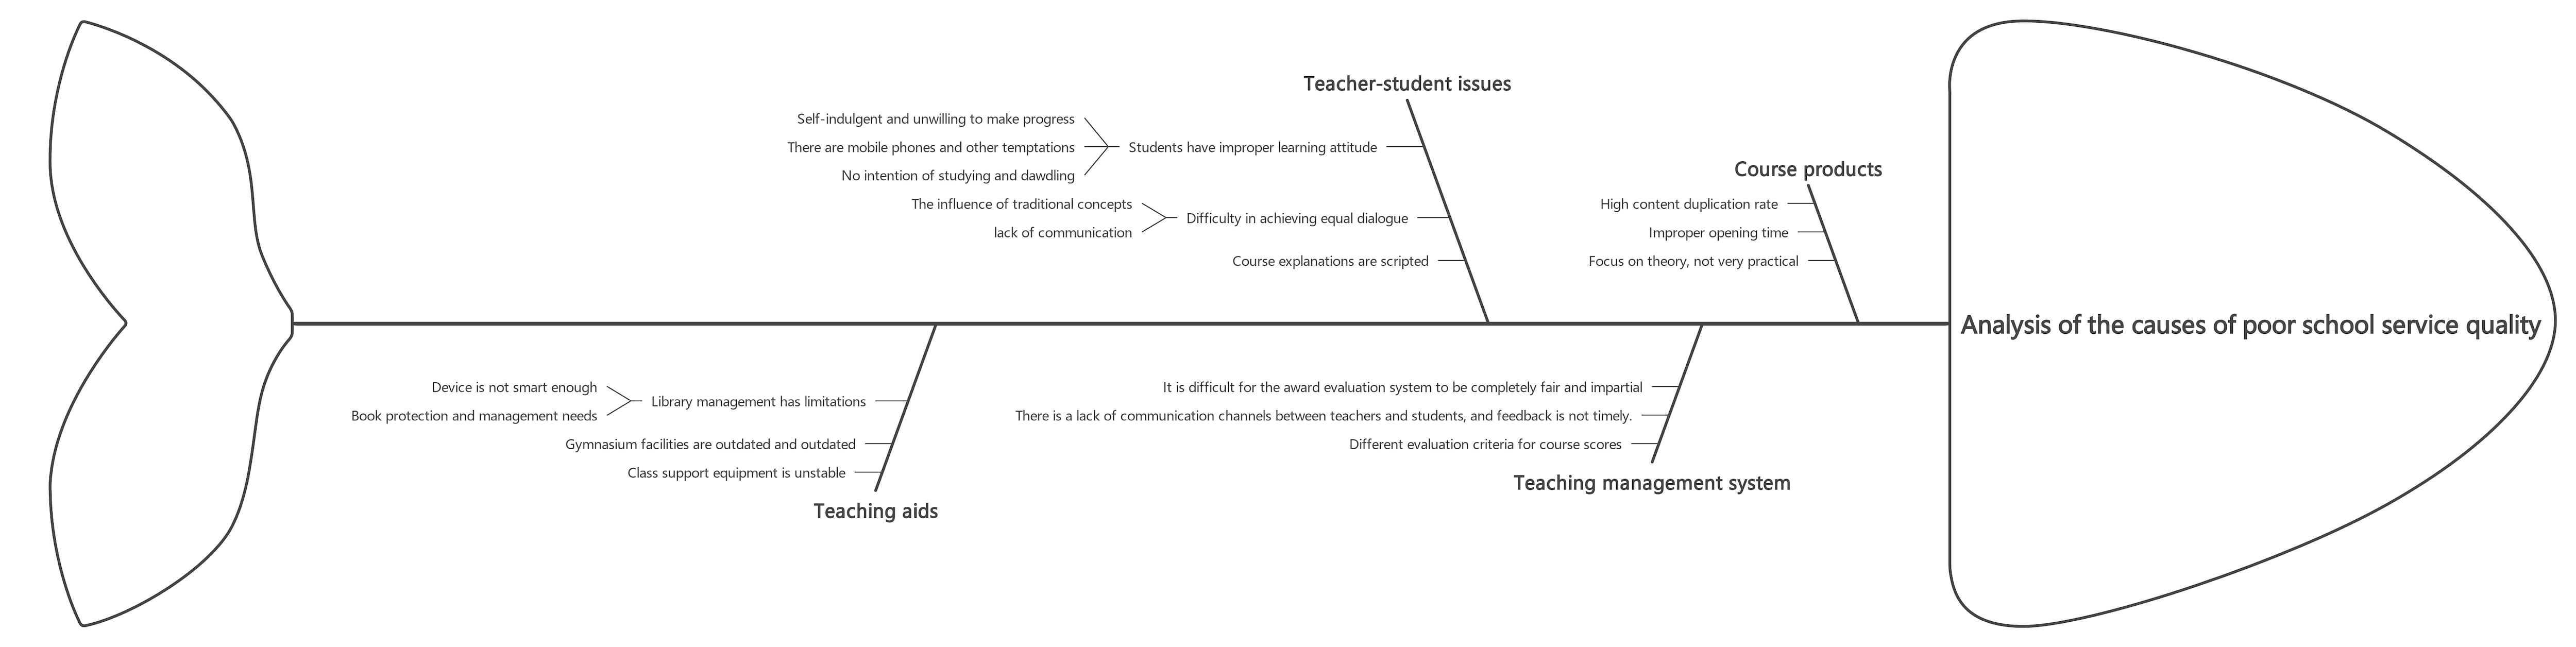
The Fishbone diagram identifies the root causes of poor service quality in schools. It highlights five areas: the student-teacher relationship (Man), teacher management (Method), equipment (Machine), curriculum (Material), and assessment (Measurement). The purpose is to identify issues with teaching and learning to improve education quality.
2. Diagnosis Problems Fish Bone Diagram
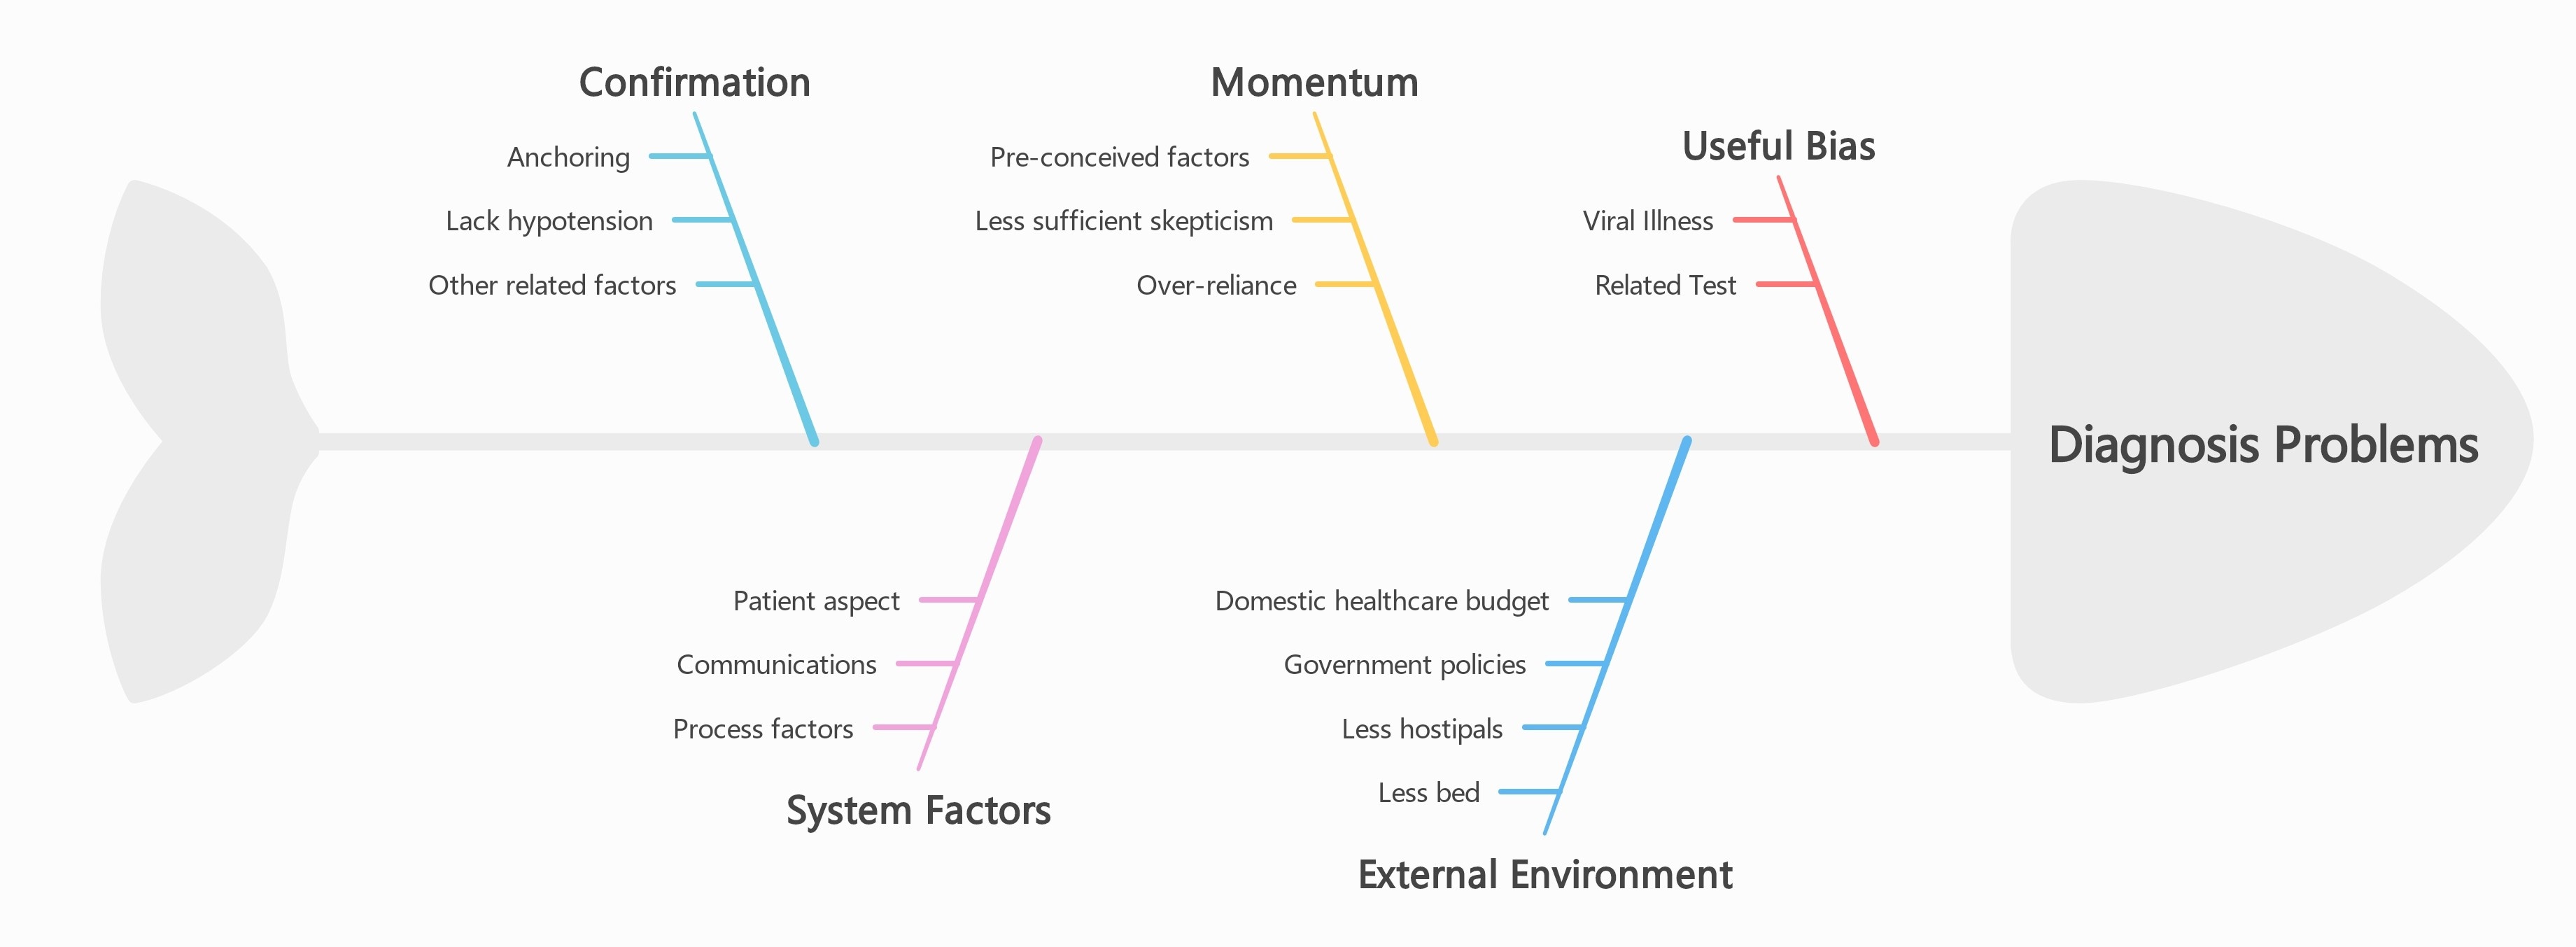
The fishbone diagram is designed for health care professionals to examine errors and diagnostic problems. It looks at the root causes through five areas: confirmation (Man), momentum (Method), useful bias (Material), system factors (Machine), and external environment (Measurement). This fishbone diagram will assist medical teams in their understanding of errors in diagnosis or abnormal findings while enhancing patient quality of care.
3. Low Market Share Fish Bone Diagram
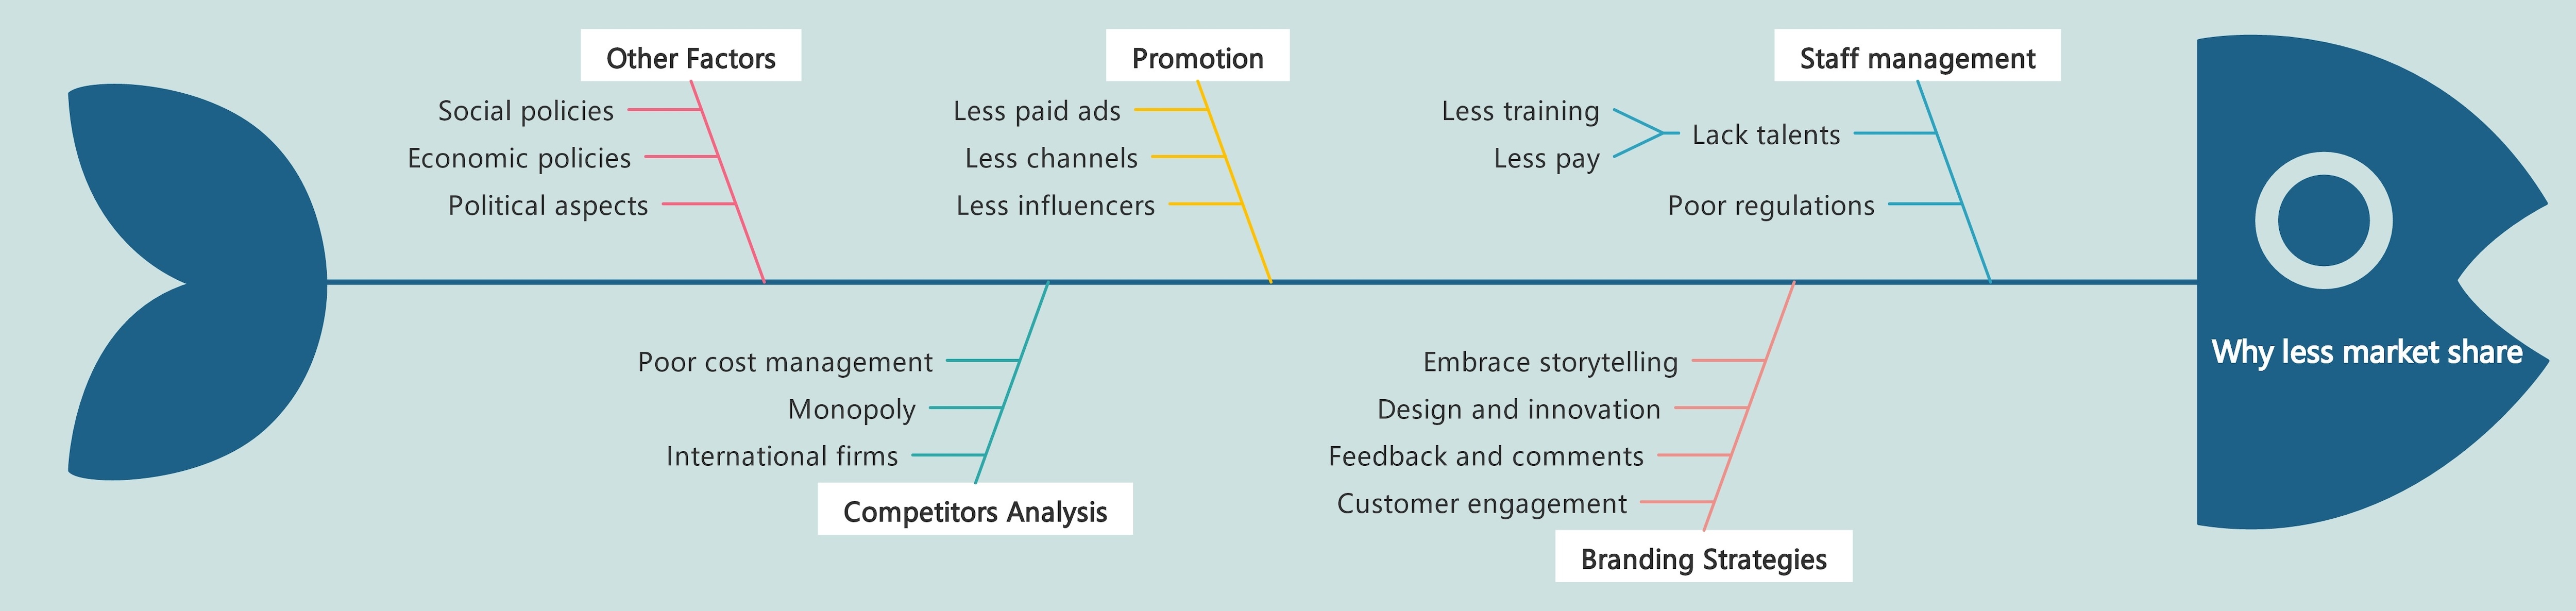
Designed for analysis in business, the low market share fishbone diagram identifies why a company may be losing market share to a competitor. It lists five factors: staff management (Man), branding strategy (Method), competitor analysis (Machine), promotional strategies (Material), and other sources (Measurement). This fishbone diagram will assist organizations in identifying their weaknesses and developing stronger growth strategies.
4. Electrochemistry Fishbone Diagram
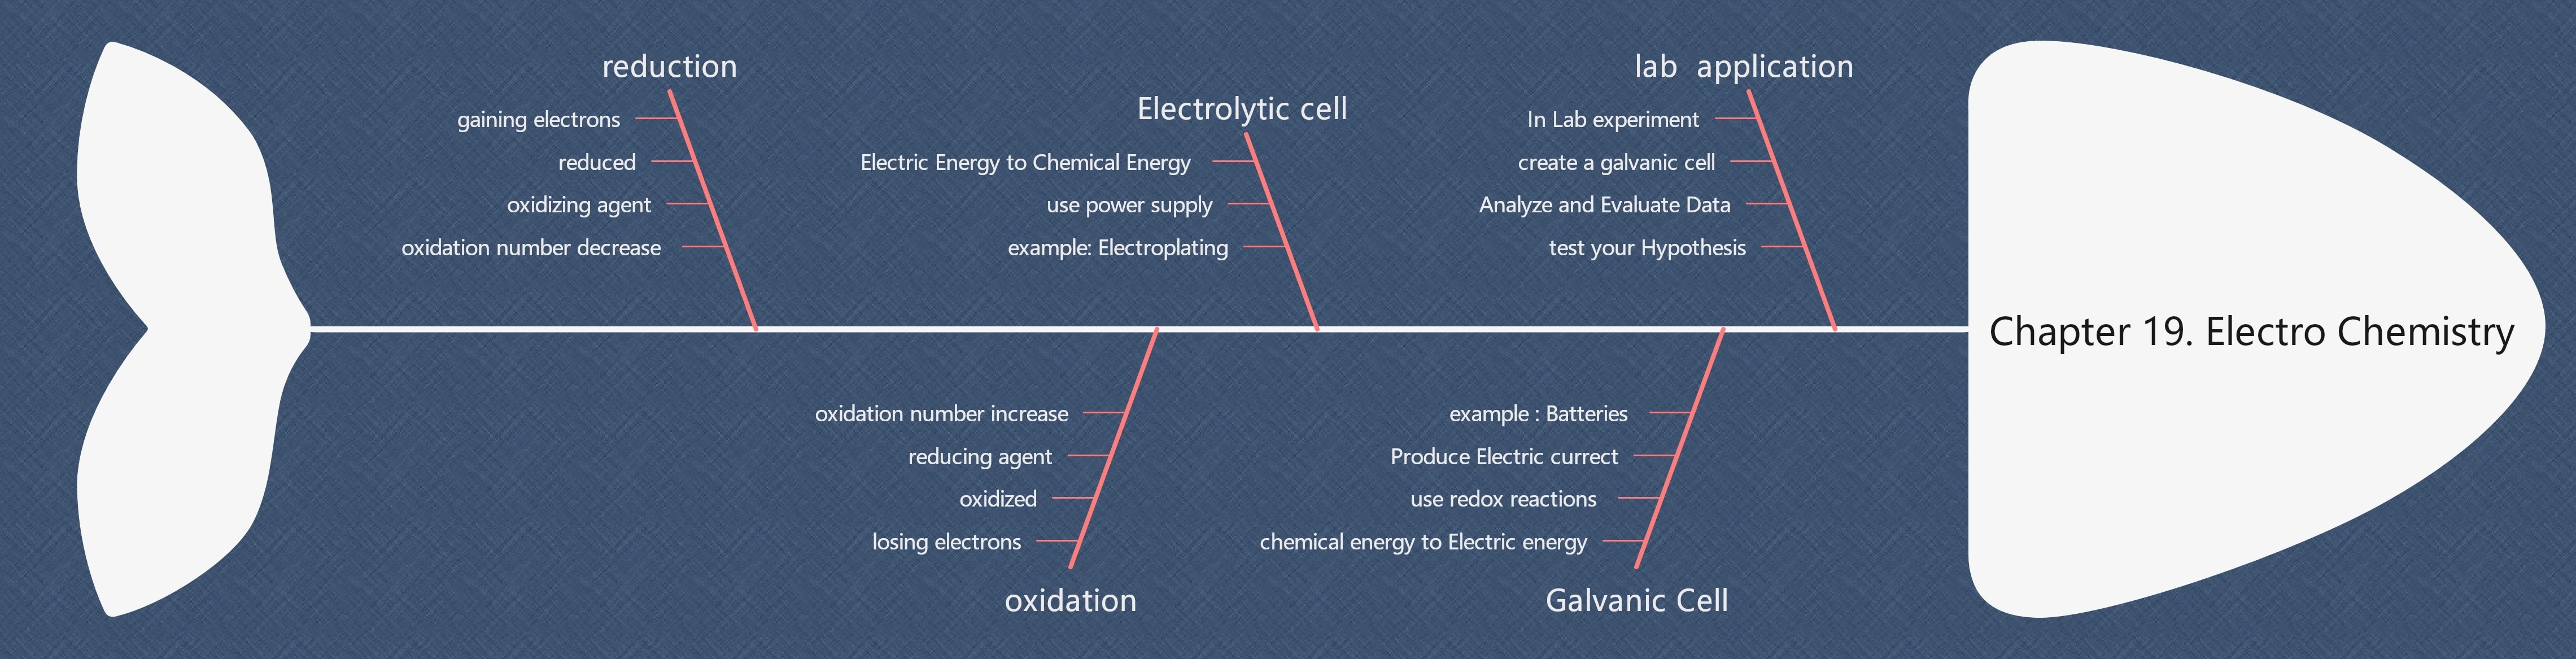
This diagram for students provides an overview of the key concepts in Chapter 19: Electrochemistry. The branches: Reduction, Oxidation, Electrolytic Cell, Galvanic Cell, and Lab Applications, show how redox reaction and energy conversion takes place. It helps learners transfer theory into real-life applications, such as batteries and electroplating.
5. Architectural Project Fishbone Diagram

This Fishbone diagram highlights the stages involved in an architectural project from start to finish. The main branches of inquiry highlight Concept Design, Working Drawings, Payment, Submission, and Project Promotion which are similar to the 5Ms. It can be used to evaluate the bottlenecks in the workflow. Articulate ideas from clients to meet the building code regulations, and enhance the overall project planning and delivery.
Closing Thoughts
Now that you understand how the Fishbone Diagram and the 5Ms work, you can see how powerful this tool is for finding the root cause of problems. It helps teams think clearly, stay organized, and make better decisions. Whether in business, education, or daily projects, it turns complex issues into clear insights.
If you’re ready to apply what you’ve learned, try EdrawMind. Create clear, professional Fishbone Diagrams easily and solve problems effectively with smart, ready-to-use templates.