Starting new projects is easy. Brainstorming ideas with your team can be a lot of fun. However, starting it, especially planning it, can be a bit of a hassle.
Planning can be a tedious process that requires considerable effort. While you can start a project without setting specific goals, it’s going to be hard because you won’t be able to set your priorities straight.
This article will explore a method for planning your projects more effectively: project timelines. You will see how they can help you prepare better so you can focus on what matters more: finishing the project itself.
In This Article
What Are Project Timelines?
First, what a project timeline is. In a nutshell, it’s a visual roadmap that shows all the key stages and deadlines of a project. It also sometimes lists the specific tasks involved in each.
From the definition itself, you can see that the team can use the project timelines to stay aligned with the schedule. Teams can even make more use out of it by adding the specific persons assigned or leading certain stages.
Parts of a Timeline
The main parts of a project timeline include the following:
- Calendar or timeframe, which may refer to the dates as labeled. You can also incorporate a calendar in the timeline itself.
- Milestones, which are usually represented by diamond icons. These mark the key stages of the project and give your team a sense of what you’ve accomplished so far.
- Tasks and deadlines are optional. For a more detailed timeline, these are ideal, however. Laying out the tasks to be accomplished before each milestone can be really helpful for tracking.
Different Types of Project Timelines
Lastly, for this part, here are the different types of project timelines:
- Linear timelines show tasks in a simple chronological order. These are best for smaller projects.
- Gantt-style timelines are more complex to view because they display overlapping tasks across a horizontal time axis.
- Milestone-based timelines that focus on key goals (through milestones) rather than detailed tasks. It’s better for presentations or giving the team a general sense of the work ahead.
How To Create a Project Timeline
After learning about the kinds and parts of a project timeline, you can put your knowledge into practice by creating your very own. While it may seem daunting, it’s actually easy, especially with the right tool.
Wondershare EdrawMind
Here, you can try to create a project timeline with the help of Wondershare EdrawMind. It’s a tool that provides you with AI tools like diagram generators, chatbots, writing tools, and more.
All these, while giving you access to thousands of creative elements like stickers and typefaces, with intuitive drawing tools. In summary, EdrawMind will help you create a project timeline more easily and enjoyably.
Steps To Make Your Own Timeline in EdrawMind
Now, you can get your feet wet. Launch Wondershare EdrawMind and follow the steps below. Below are the steps for creating a project timeline using the tool.


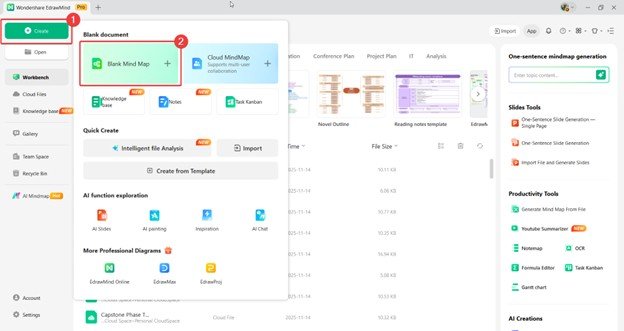
Step 1 Create a New Project
Start a new project through any of these actions:
- In the homepage, go to Create > Blank Mind Map.
- Alternatively, you can generate a mind map or use a template from Gallery.
Step 2 Change to Timeline Layout
Next, perform the following actions to change the default mind map to a timeline:
- On the right-hand panel, open the Layout menu.
- Then, select a format from the Timeline options in the pop-up menu.

Step 3 Edit Text and Add Nodes
Third, here’s how you can add text or new nodes to the timeline
- Double-click on nodes to edit its text content.
- Use the appearing customization bar to change the font style, color, text, etc.
- Use the Topic/Subtopic tool to add more nodes.

Step 4 Customize
It’s time to beautify your timeline. Several editing tools are available within EdrawMind. You can either:
- Add images under Insert > Picture
- Add helpful stickers under Insert > Mark
- Change the Theme style on the right-hand panel
- Change a specific node’s Shape, Fill, Border, or Connector format to emphasize certain items within the project timeline.

Step 5 Export
Lastly, export the timeline.
- Click the Export button on the top-left ribbon
- Choose a file type (PNG, JPG, PDF, Visio, etc.)

Advanced Techniques for Timeline Creation
In the previous section, the basic method for creating a project timeline was taught. While that is helpful, as you practice more, you’ll discover some timelining techniques that will elevate your work.
Here are some advanced techniques for creating timelines. These additions will help you and your team track progress more accurately or more efficiently.
Integrate Other Diagrams
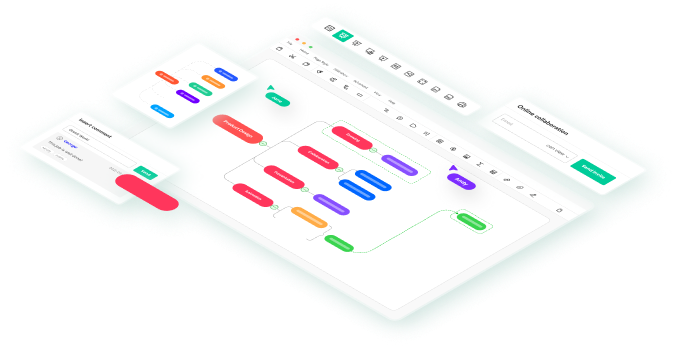
The first, and probably the most helpful tip, is to integrate other diagrams into the timeline. This allows you to make more use of space, especially when you’re using real-time collaboration tools.
For example, you can add a timeline on one side and a work breakdown structure on the other. Adding the initial brainstorming mind map in the same space can also guide your team on original ideas.
Use Task Priority and Progress Indicators
You can also use task priority and progress indicators. Adding symbols or color codes helps highlight which tasks need immediate attention and how far along each task is.
This visual feedback enables teams to identify delays promptly and adjust their workload accordingly.
Add Hyperlinks or Attachments
Another helpful feature is adding hyperlinks or attachments. These can point to documents, guides, spreadsheets, or external resources that support the task.
Instead of searching for files, team members can access everything directly from the timeline.
Make Use of Real-Time Collaboration
Lastly, using a tool that supports real-time collaboration will be really helpful. This removes the stress of sharing files back and forth and keeping track of who held the version and who edited what.
Luckily, EdrawMind, the tool used in the above section, supports this. You can start there and explore how real-time collaboration can improve your team’s efficiency.
5 Project Timeline Examples
Lastly, if you need inspiration for your work, this section provides five useful examples of what a project timeline should look like.
The templates below are sourced from EdrawMind’s Mind Map Gallery, which features over 30,000 user-generated diagrams. You can view the gallery for additional timeline templates.
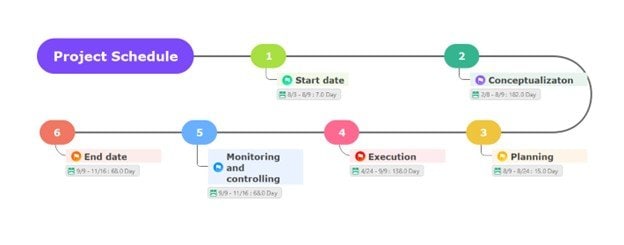
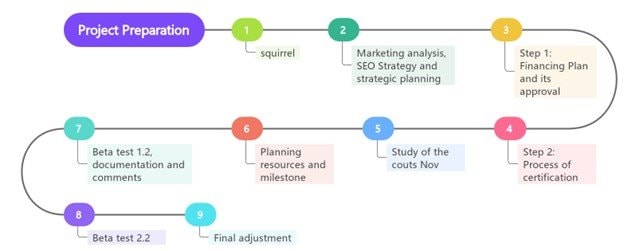
Winding Horizontal Project Timeline
First, here is a basic project timeline layout. A winding layout is popular because it makes effective use of space and facilitates easier readability. However, it does sacrifice details, especially for bigger projects.
Still, these are great for presentations or simply giving a team an overview of the project's milestones.
Project Timeline With Checklist
Second, here’s a more expansive version of the winding timeline provided above. This is because this template incorporates checklists within the project timeline itself.
Using real-time collaboration is a great idea for timelines. This is a perfect example of that because the team can check off tasks as they finish. Then, everyone receives updates on the progress.

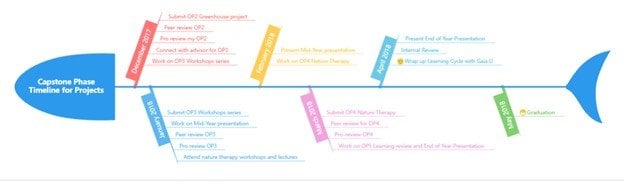
Ishikawa Project Timeline
This timeline is a unique take. The Ishikawa diagram is often used for analysis purposes, but who says it can’t be used for timelines as well?
As you can see below, the fishbone diagram is used to outline the key stages (bones). Then, the specific tasks beside them. This capstone phase timeline is a great way to use this unique timeline design.
Blockchain Project Timeline
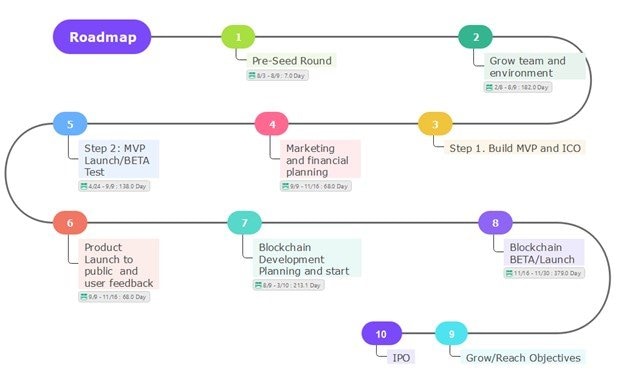
Here are more practical examples. Below is a blockchain project timeline, ideal for companies or organizations seeking to stay ahead in the latest tech trends.
If you’re also looking to start something blockchain-related, this timeline can serve as a great head start. It utilizes the winding timeline format introduced in the first example.
Product Launch Timeline
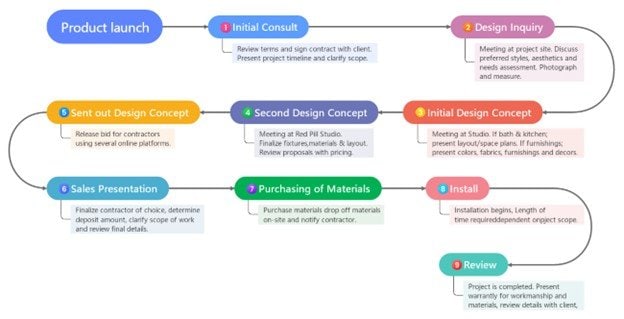
Lastly, here’s a product launch timeline that you can easily follow. For marketers, this is especially helpful because you’ll know when to post teasers or other promotional material as necessary.
For the R&D and manufacturing side of the company, they’ll appreciate this because you can incorporate the deadlines. This gives them a clearer view of the desired outcomes and target dates for the launch.
Conclusion
Overall, using project timelines can be extremely beneficial not only for organization, but also for efficiency. They help teams stay aligned and track their progress. Ultimately, it’s straightforward to understand what needs to be done.
You can maximize a project timeline’s potential with the right tools. Using tools that offer real-time collaboration, AI tools, templates, and creative options are great, especially for beginners.