
From healthcare to engineering, project management, and quality control units, fishbone diagrams are used to solve problems and determine cause-and-effect relationships. Straightforward and effective, these diagrams are integrated into industry reports to visualize and comprehend complex information.
MS Word is a staple tool for professional documentation, given its ability to facilitate text-intensive reports. Though most people draw basic graphs and charts in their MS Word, diagramming is not its best attribute, and for good reasons. It is a word processor designed to create documents and text, not visuals.
Hence, making a fishbone diagram in Word with limited shapes and manual formatting options may take time and effort. To cut fishbone diagram creating time short, it's best to use a virtual tool like Wondershare EdrawMind that has pre-built designs, infographics, customization tools, and multi-file support. We will be discussing both software in this detailed guide. So, stay tuned!
In this article
How to Make a Fishbone Diagram in Word
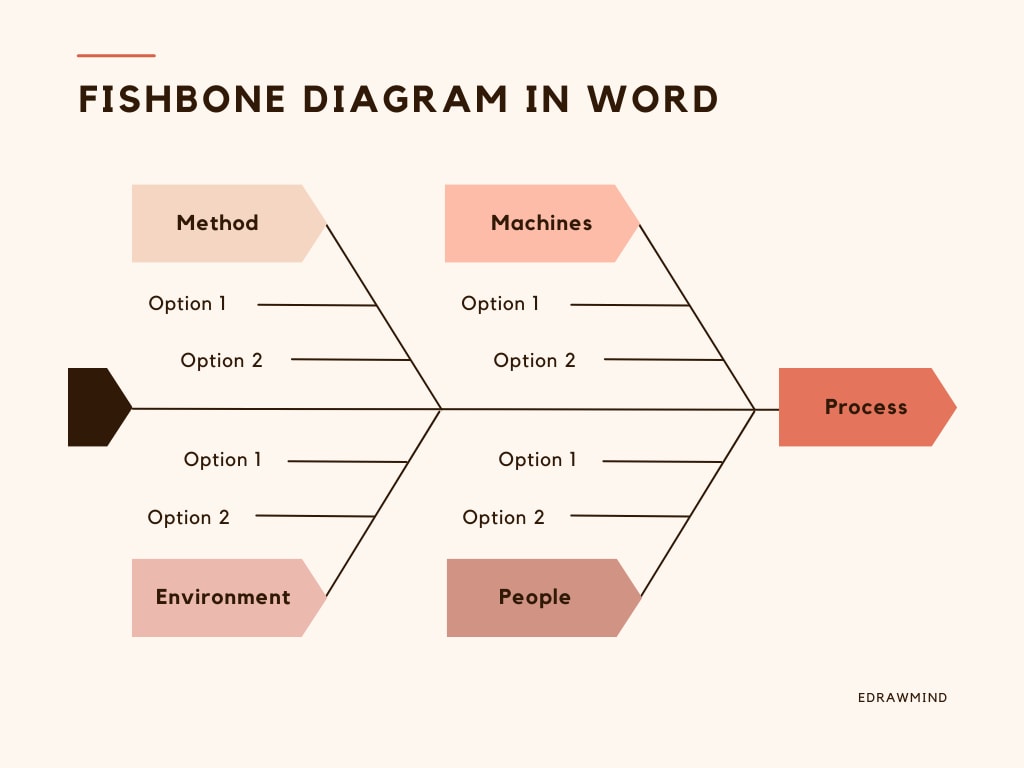
MS Word is a popular alternative for documentation. Though it is an excellent tool for text-heavy reports, you may not like its limited diagramming functionality. It lacks formatting options, shapes, and templates, making it a real pain to create diagrams like Fishbone. Want an easy way out? Skip to the next part.
However, if you have no other option, here is how to make a fishbone diagram in Word.
Step 1: Prepare
The first step to a successful fishbone diagram is planning. So, get your team together, schedule a meeting, and brainstorm. Note down the problem statement, potential causes, and their contributing factors to ease the drawing steps for later.
Step 2: Create an Outline
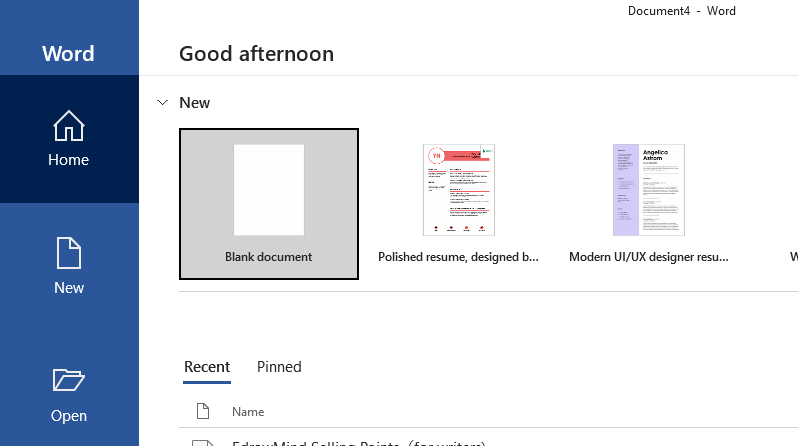
Once you have the key information, launch MS Word and click New to open a black document.
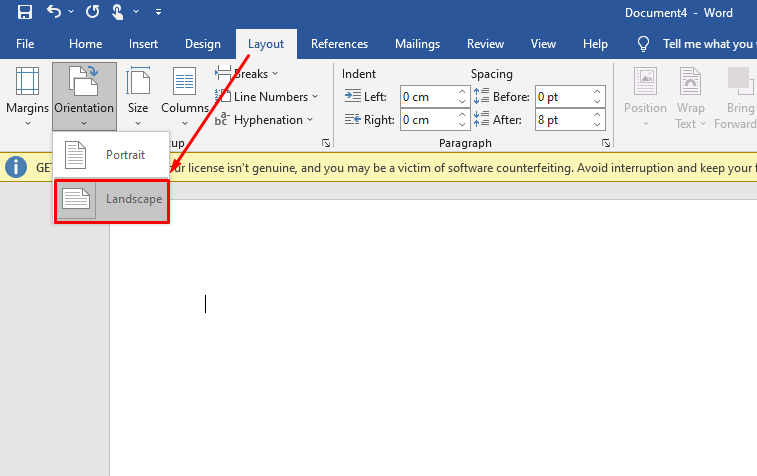
Now, change the page orientation by clicking Layout > Orientation > Landscape. It will widen the canvas space to conveniently expand the fishbone diagram.
Sadly, you will not find pre-built fishbone templates on Word. For that reason, you will have to add everything manually.
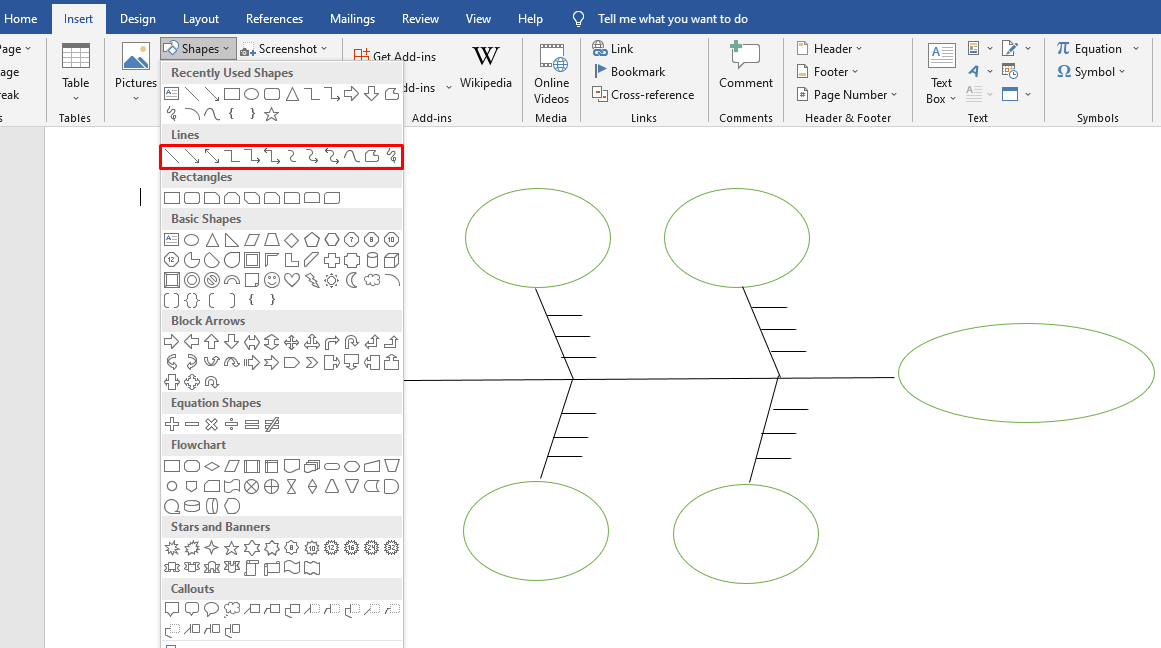
Now, proceed further and create an outline. Add a shape for the problem statement and link it with a straight horizontal line for the fish spine. You can do this by clicking Insert > Shapes > Preferred Shape. Likewise, add shapes for causes or fish ribs. Let us use ovals for this diagram.
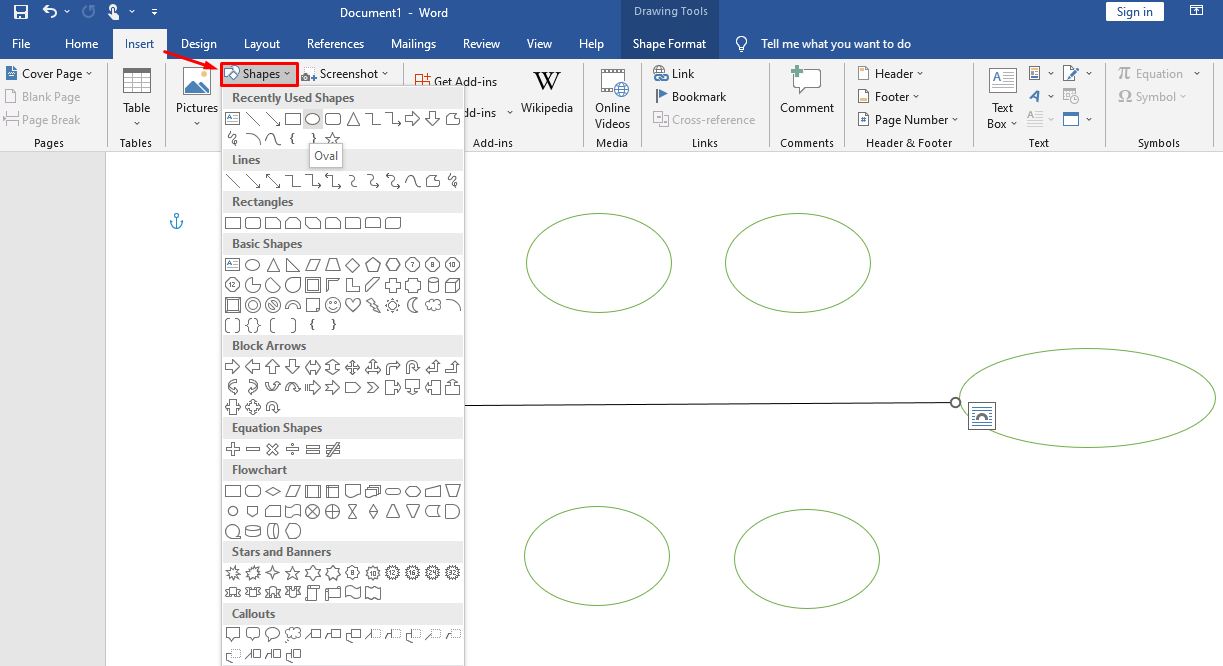
Once you have added ovals for the problem statement and causes, it is time to link them together with the fish spine. You may use straight lines for this. So, again, go to Insert > Shapes and select any line from the shapes library.
Step 3: Add Text
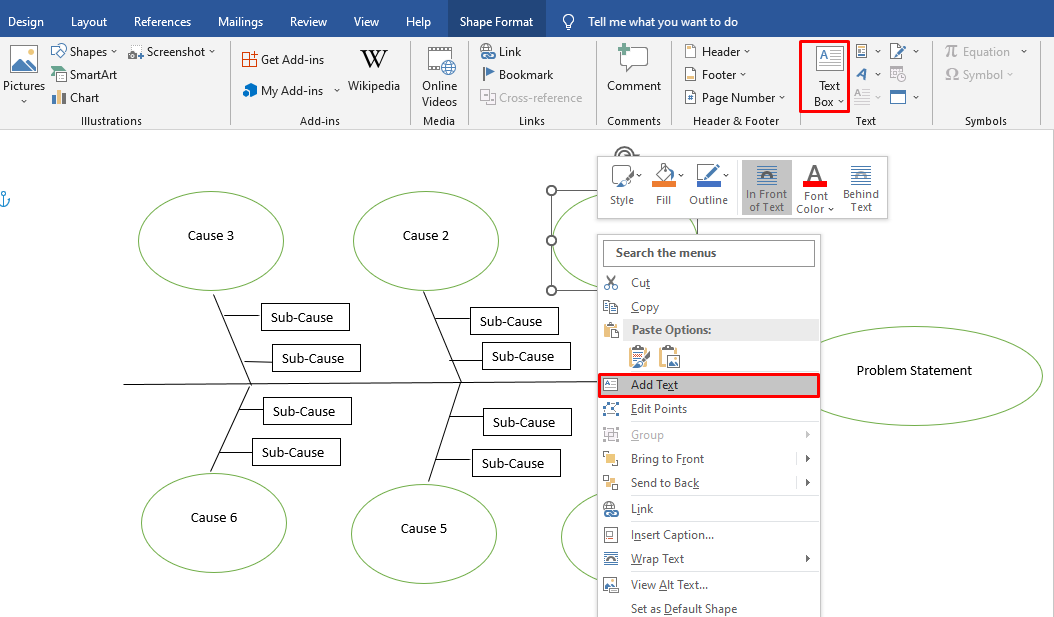
Now that the fishbone outline is complete, you can add text using these two methods.
- Right-click any shape and click Add Text to write over it.
- Click Insert > Text Box from the top toolbar for the sub-causes category.
Step 4: Format the Diagram
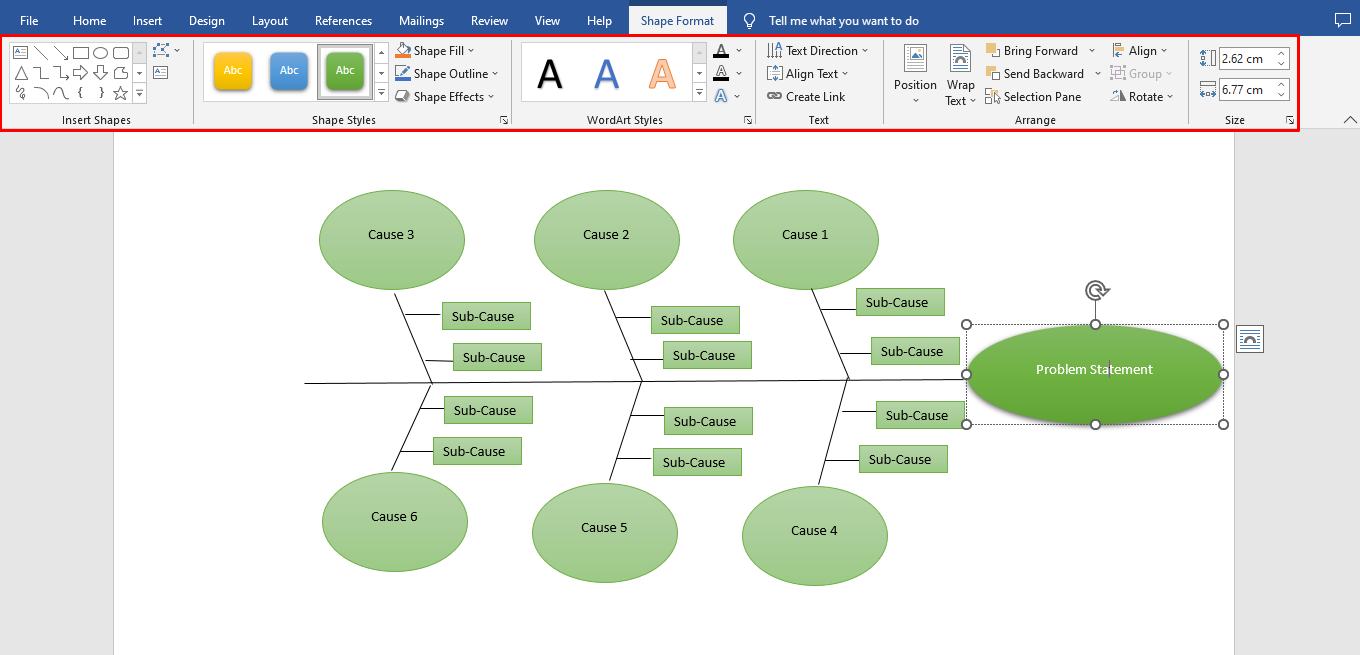
Your diagram is designed according to the Word presets. However, it could look more appealing. Changing the diagram's formatting and colors is a great way to attract the audience's attention. Unfortunately, MS Word lacks ready-made themes. So, your only option is to change each shape's formatting manually.
Double-click any shape, and it will open a Format tab on the toolbar. From here, you can change its color, outline, line weight, and so on.
Step 5: Download the Diagram
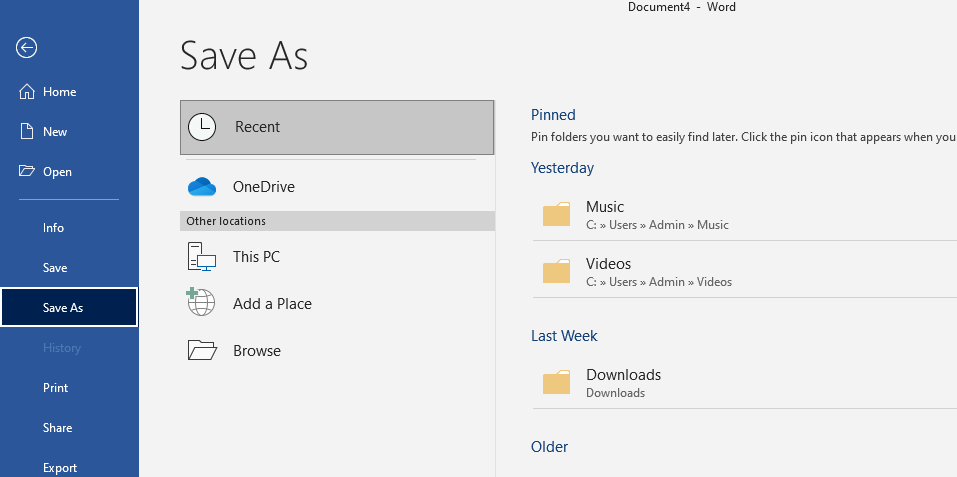
Congratulations, your fishbone diagram is ready. Download this by clicking File > Save As > Preferred Location from the top-left corner.
How to Make a Fishbone Diagram in EdrawMind
Making a fishbone diagram in Word demands patience, time, and effort. So, don't restrict yourself to one tool; try out the EdrawMind virtual space. It allows you to create the fishbone diagram using free templates and quick formatting tools. You can also export the final design in a Word format, making it easy to integrate into industry reports and documents.
So, let us proceed further and check how to make a fishbone diagram in EdrawMind from scratch or by using a free template.
- First, download the Edrawmind desktop version and register your email if it is your first time.
- Log into the account and proceed further.
Method 1: Make a Fishbone Diagram From Scratch
Step1Create an Outline
Click New > Fishbone Diagram from the dashboard to start working on the fishbone outline.
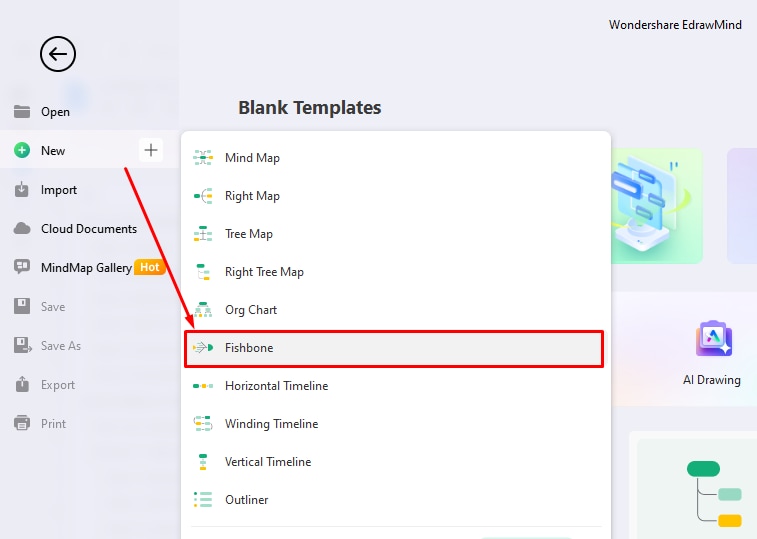
Now that you see a raw fishbone structure on the editing panel, it is time to expand it. Add topics and sub-topics from the top toolbar or by right-clicking the Main Topic button on the canvas. This way, you can customize the causes and sub-causes fields to your suitability.
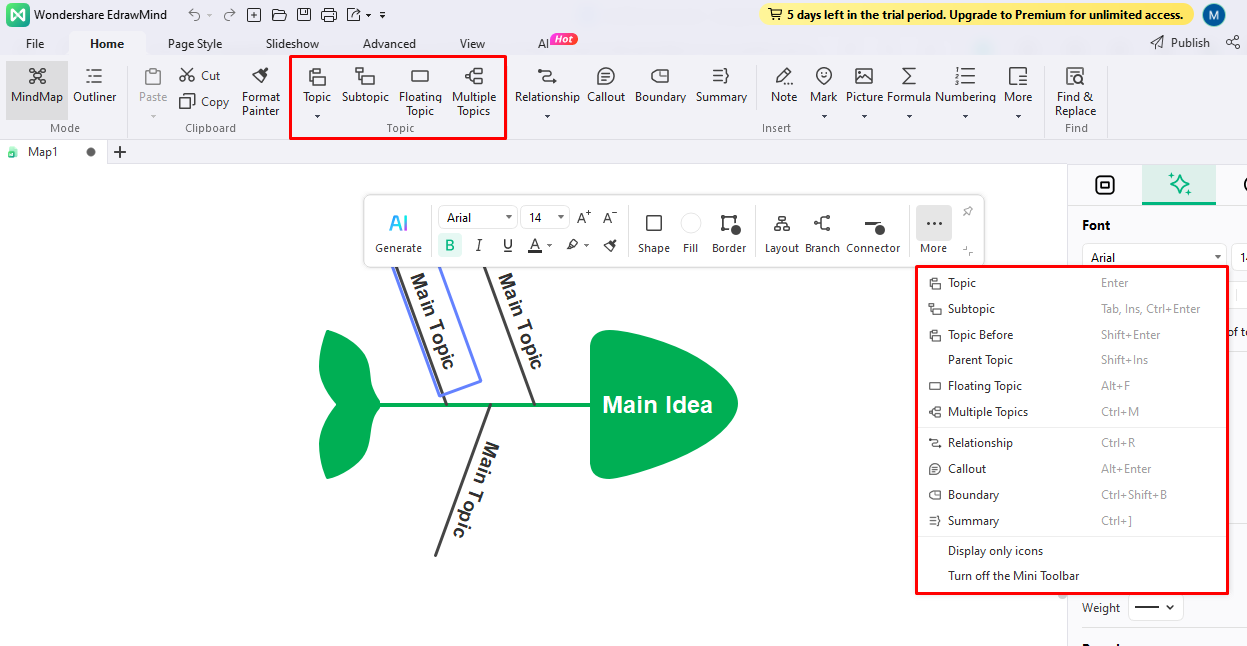
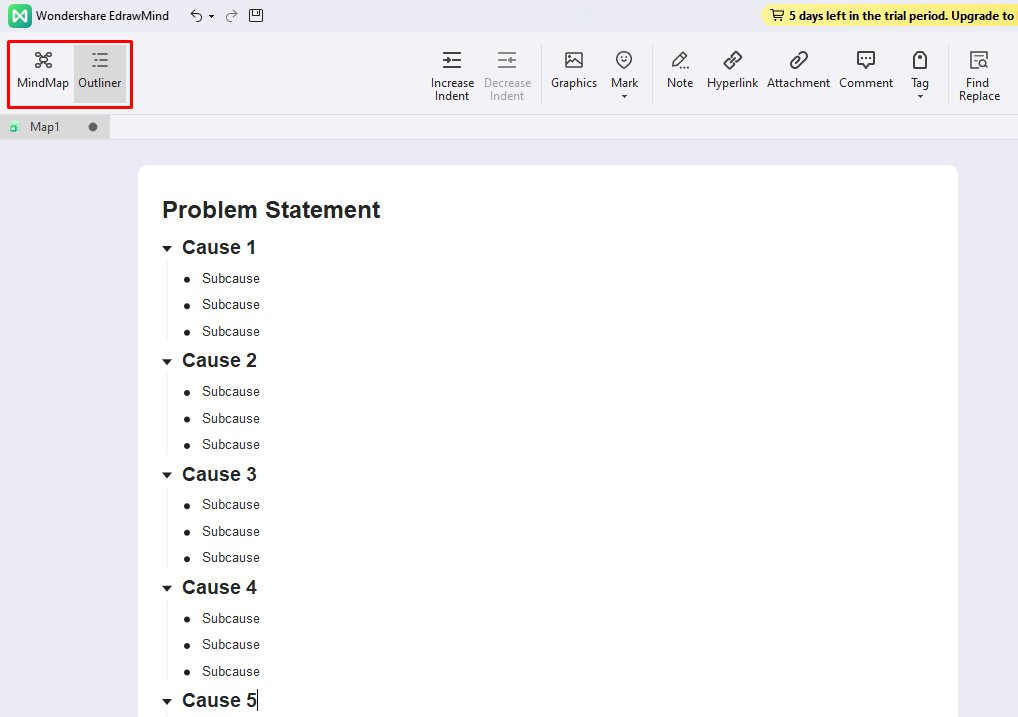
If you already have an outline and don't want to waste time by manually adding the topics and subtopics, switch to the Outline Mode from the top-left corner. Edit the data in an outline format and click Mind Map; it will automatically change the text into a fish-like structure.
Step2Customize the Diagram
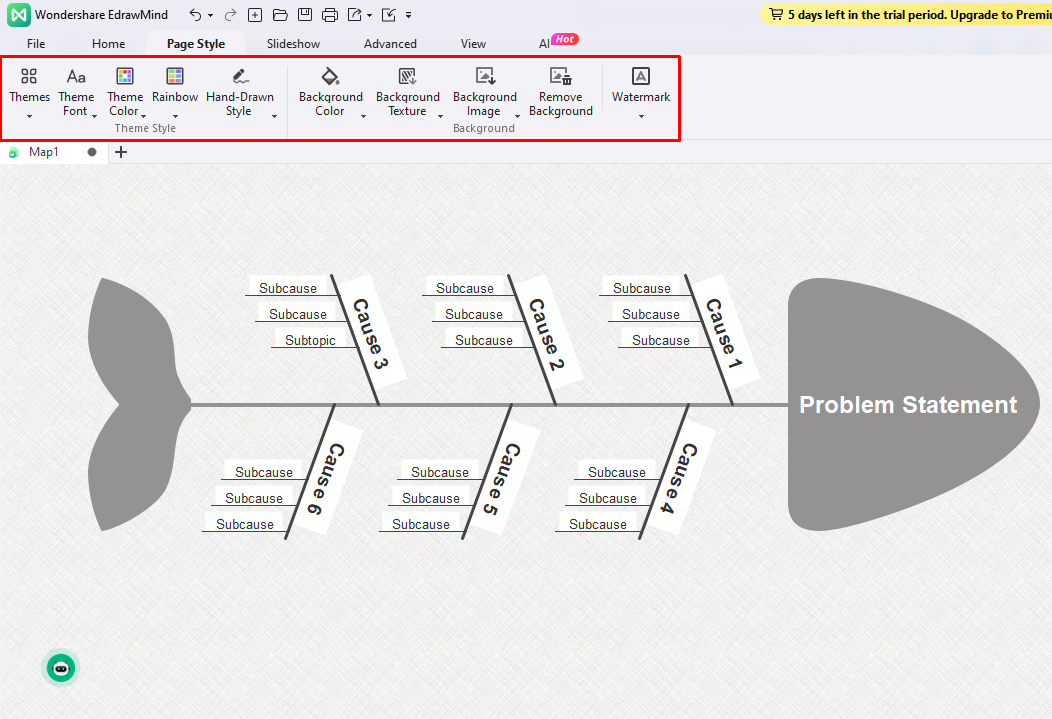
A visually striking and decluttered diagram is the right way to keep your audience hooked. So, turn to the Page Style from the top toolbar and change the diagram formatting. It allows you to modify the theme, background color, shape, and font style with a few clicks.
Method 2: Make a Fishbone Diagram using Templates
A better way to approach projects with tight deadlines is EdrawMind's pre-built fishbone designs. It narrows down the steps and requires minimum effort and time. So, let us check out how you can make a fishbone diagram using templates in half the time.
Step1Select a Template
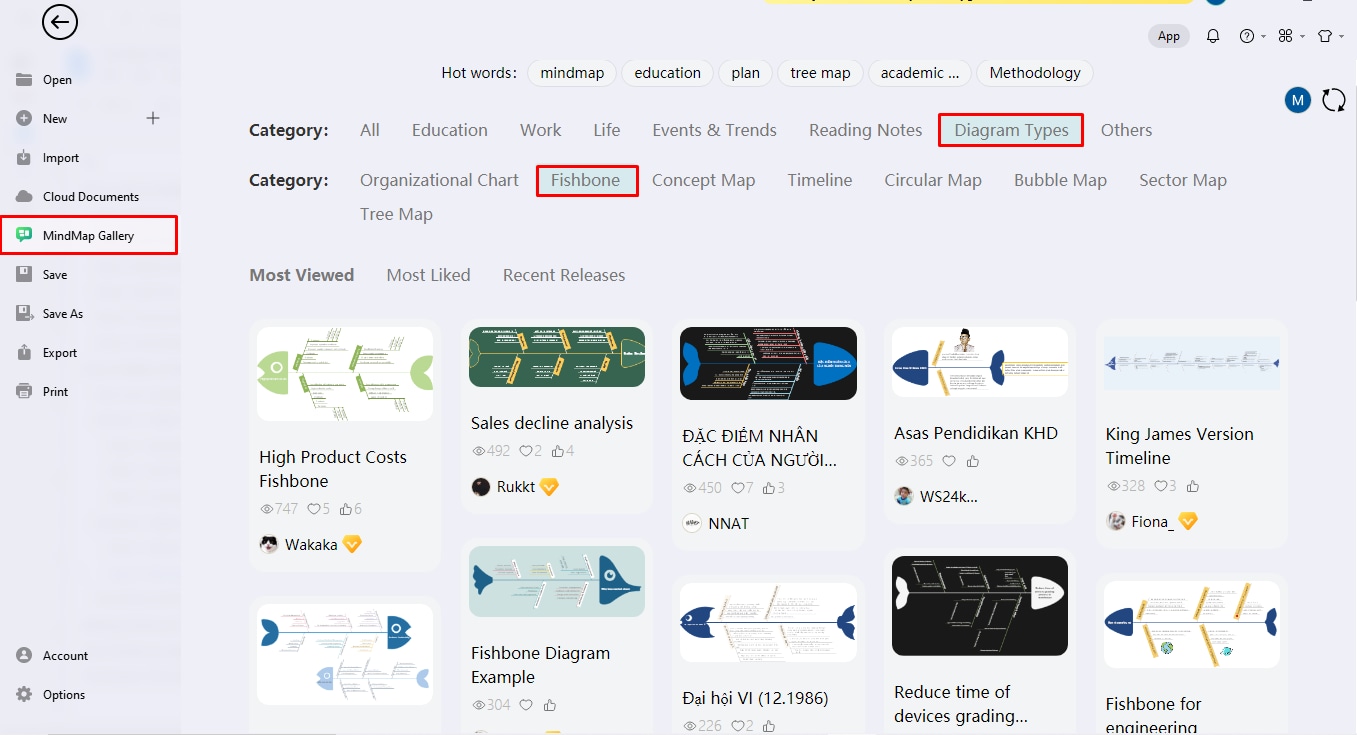
Go to the Template Gallery from the EdrawMind dashboard and filter the search results by selecting Fishbone in the Diagram Category. You will see multiple fishbone examples. Scroll down to find the right match for your task and click Duplicate.
Step2Edit the Data
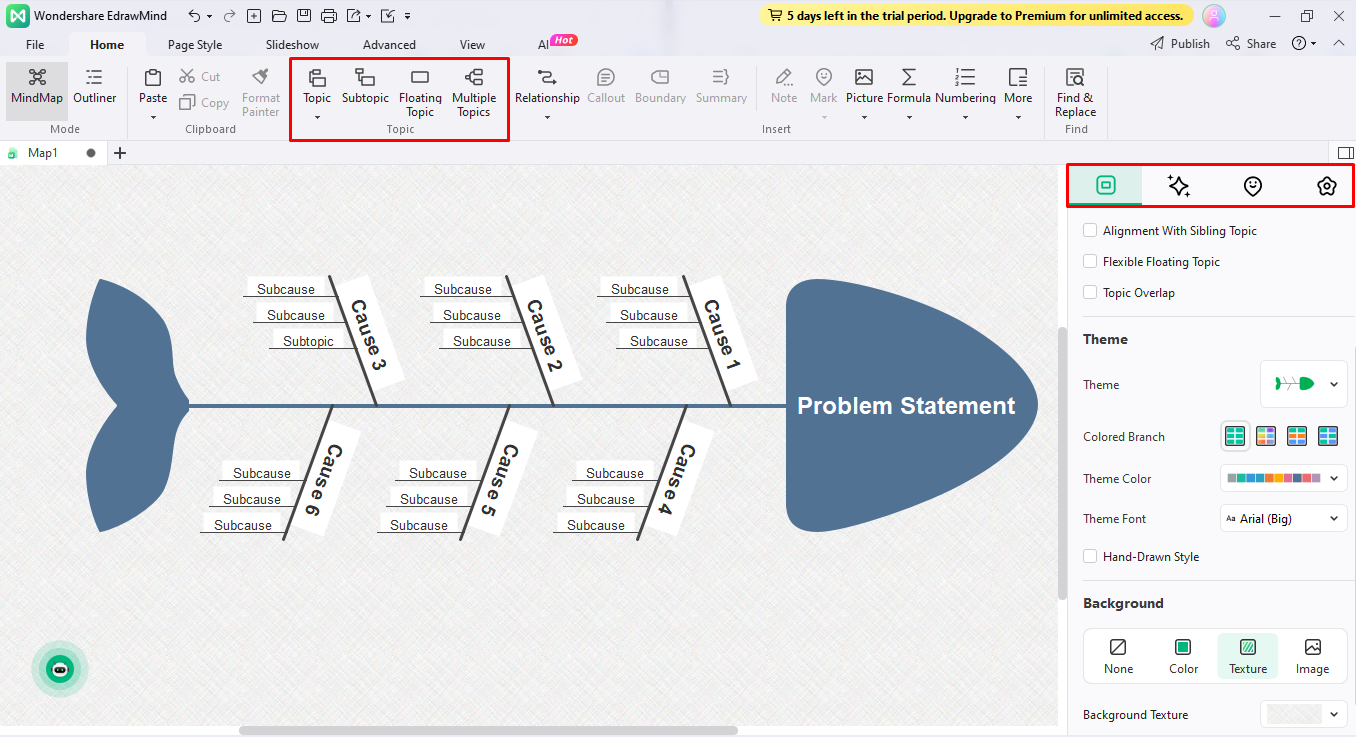
When the template opens in the editing panel, you can add or remove Topics and SubTopics from the top toolbar. Double-check the data after you are done with the fishbone outline.
Once you are confident about it, modify the diagram's appearance by changing the theme, color scheme, and font styles from the right side information setting panel.
Step3Download and Share the Fishbone Diagram
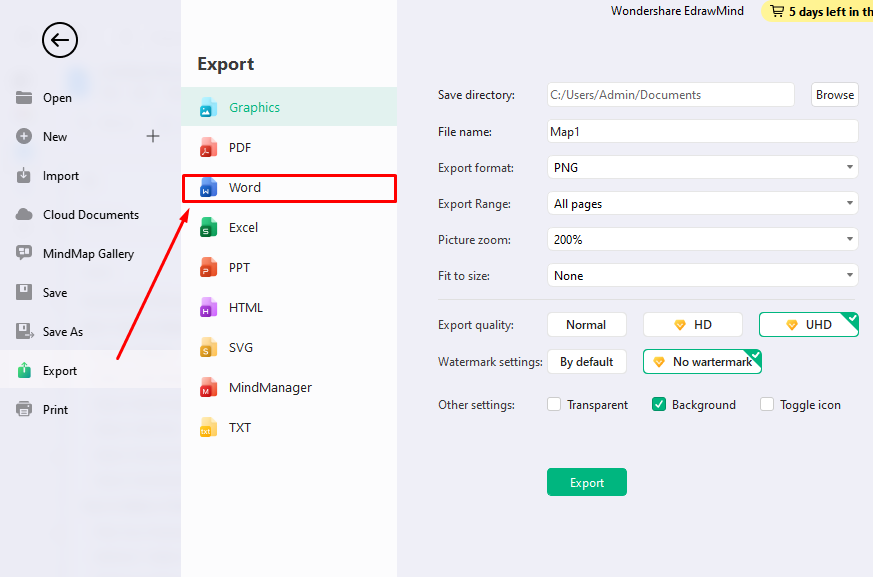
Finally, your fishbone diagram is ready. It's time to download your diagram. On EdrawMind, you can export your design in a Word format, allowing you to match your organization's needs. For that, click File > Export > Word from the top-left corner.
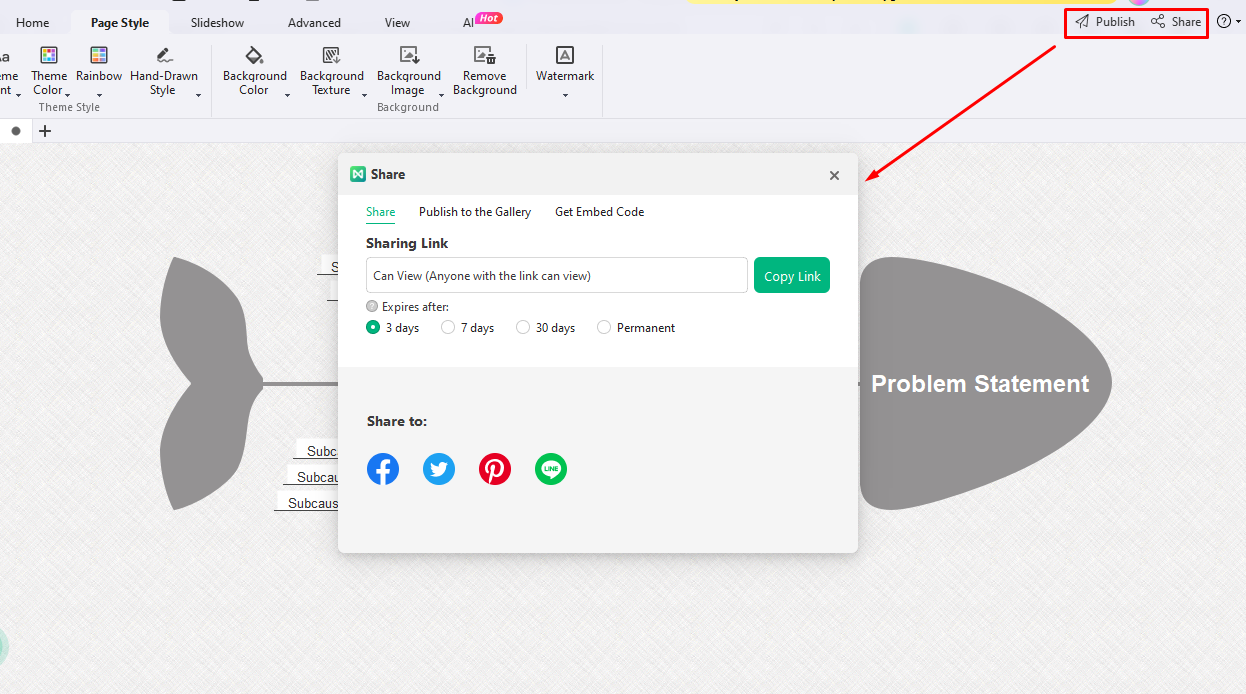
EdrawMind also allows sharing the final diagram. All you need to do is click Share from the top-right corner and set the permission.
Making Fishbone Diagram in Word Vs in EdrawMind
MS Word Vs Wondershare EdrawMind: Which is better to make a fishbone diagram? Let us compare both and check which tool is best tailored to your requirements.
1. MS Word
- A familiar interface with easily accessible tools.
- Manual formatting options (color scheme, shape outline, line weight, borders, and more).
- Allows you to integrate diagrams within reports.
2. Wondershare EdrawMind
- Diagram Scope (6000+ free templates, including fishbone designs and supported infographics)
- One-click outline-to-fishbone diagram function for non-technical users.
- User-friendly interface with easily accessible tools.
Free Fishbone Diagram Maker

Making a fishbone diagram is more than plotting shapes on the canvas and connecting them. It goes through multiple stages of brainstorming, team discussions, and feedback sharing.
Enters EdrawMind! This virtual workspace gives you diagramming assistance, team management, and a mind-mapping feature. So, you can discuss, think, and create your fishbone diagrams with a few clicks. Let us discuss why it is an excellent Word alternative.
- One-click AI Mind Maps: You can lay out processing maps to gather responses to your fishbone brainstorming sessions within seconds.
- Pre-Built Designs: It has over 6000 pre-built templates, including fishbone diagrams, brainstorming, and processing maps examples.
- Cloud Storage: You can auto-save and access designs anywhere, anytime.
- Real-Time Collaboration: It allows team members to view, edit, and give feedback on your designs.
- Multi-Format File Support: Want to integrate your diagrams in presentations and documents? EdrawMind allows you to export them in PPT, Word, PDF, and more.
Conclusion
Stop taking hours to create a fishbone diagram in Word. It may be a common practice but not compulsory. Our familiarity with the interface and the convenience of drawing a diagram within reports might sound tempting at first. But, the absence of templates, limited shapes, and manual formatting can make it hectic, challenging, and time-consuming.
What's better is a professional diagramming tool like EdrawMind that allows you to make fishbone diagrams with free templates and quick customization tools in minutes. It even supports multi-file format, allowing you to download the final diagram in a Word file. So, why choose the hard way when you have a smarter option?


